Overview
This guide covers the core card payment integration end to end: registering a user, collecting their card through the Push Widget, authorizing a transaction, handling step-up authentication when the authorization engine requires it, and retrieving the final result. The widget renders and tokenizes the card, so your integration is limited to generating a URL, tokenizing through the widget, and authorizing against the Push API.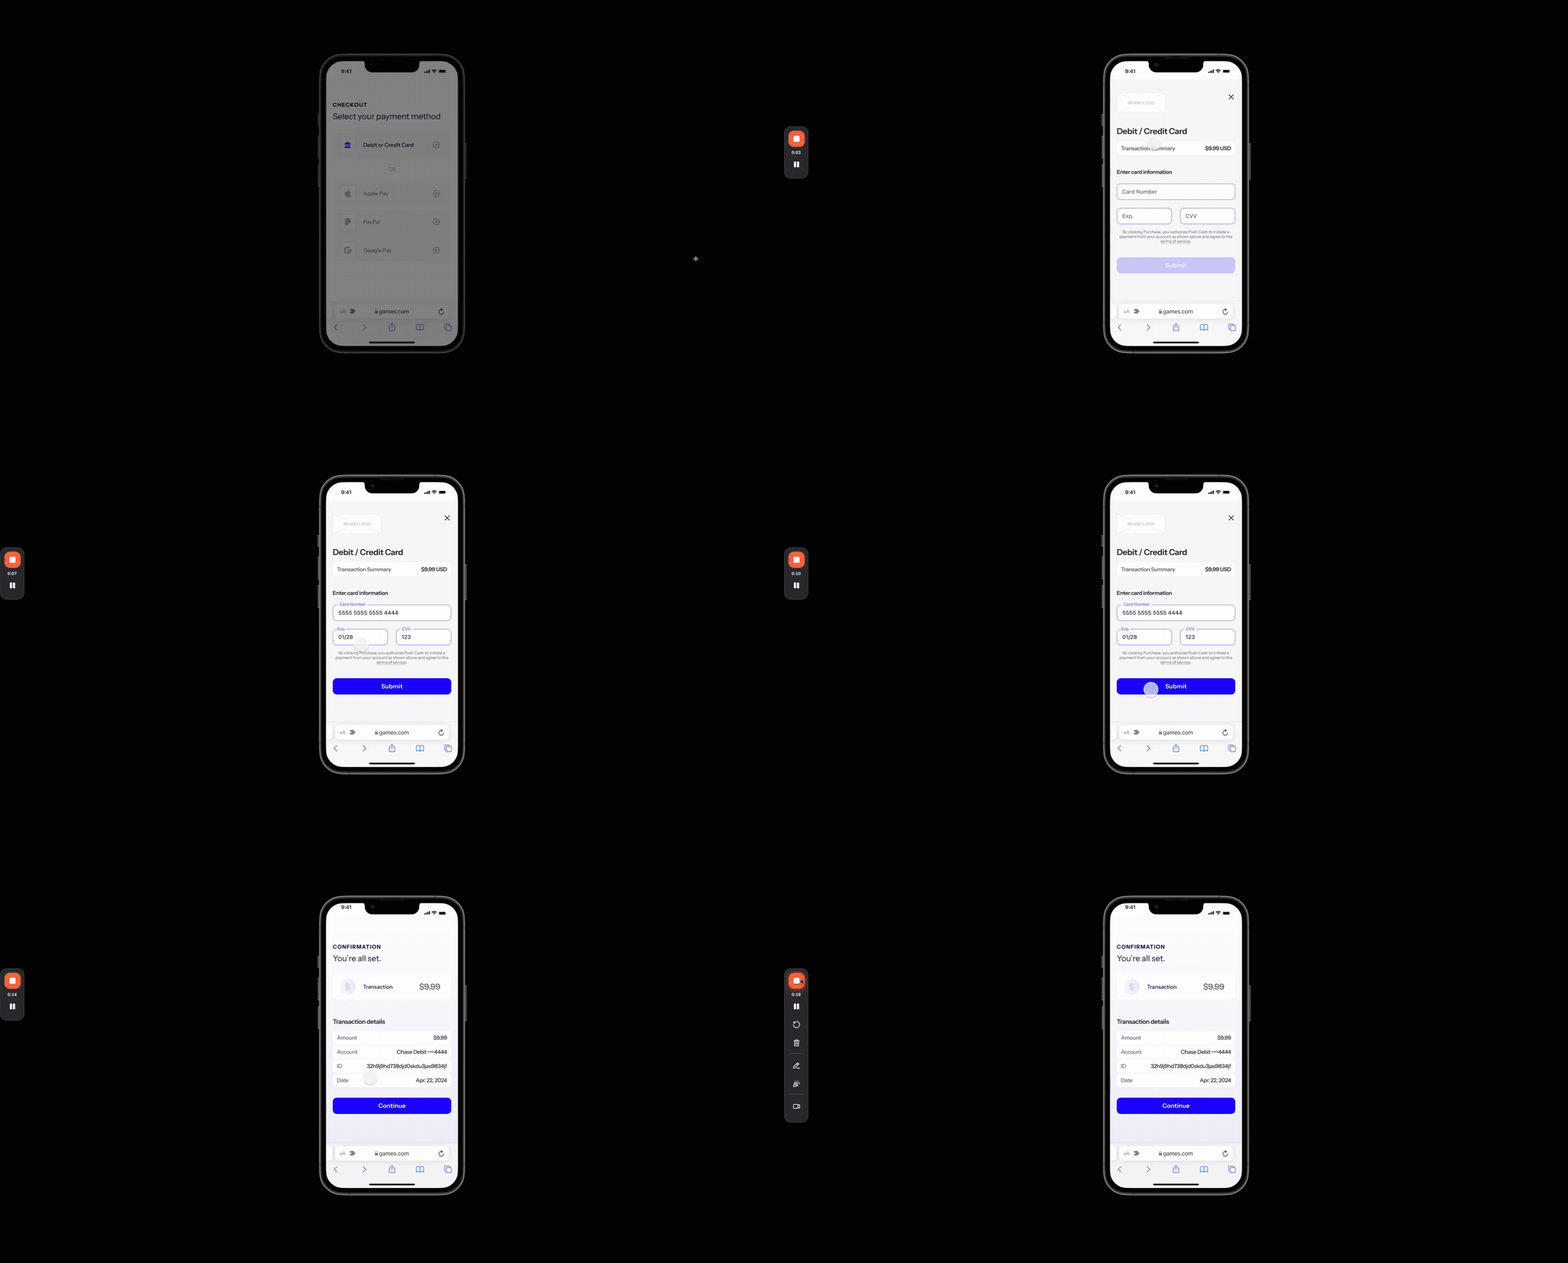
cash_out), see Withdrawals.
Integration overview
The steps below show an overview of how to process a card payment.-
Register the user. Call the create-user endpoint with the user’s identity information (name, email, address, and phone number).
- Store the returned Push
idalongside your internal user record. - Register each user only once and reuse the
idon every subsequent transaction. Provide your internal user identifier in thetagfield to ensure idempotency.
- Store the returned Push
-
Display the widget. Call the create-user-url endpoint with the user’s
idand paymentdirection, then render the widget to your payment page using the returnedurl.- The widget automatically validates the card and invokes the
onValidcallback when the form is complete — enable your submit button there. - For a returning user, you can skip the widget and let them pay with a previously-stored credential instead. See Stored credentials.
- The widget automatically validates the card and invokes the
-
Authorize the transaction. When the user submits, generate a
tokenfrom the widget (or use a storedcredential_id) and call the authorize-payment endpoint with the payment details (amount,currency,direction), thetoken, and aredirect_url. Handle the response by its HTTP status code:202 Accepted— the user must complete authentication. Persist the returned intentid, then continue to step 4 using the returnedurl.200 OK— the payment was approved immediately. Notify the user that the payment succeeded.401 Unauthorized— the payment was declined.
If your organization is assigned multiple settlement accounts, include the relevantaccount_idon every authorization request — retrieve the list with list-accounts. Omittingaccount_idwhile multiple accounts exist will fail the request. Organizations with a single settlement account can ignore this. -
Direct the user to complete authentication. Navigate the user to the
urlreturned from the authorize call. When the flow completes, the user is returned to your application via theredirect_urlyou set on the authorize request. Present the authentication UI in an iframe or the device’s system browser depending on your environment — see Presenting the authentication UI. -
Retrieve the result. Call the get-an-intent endpoint and inspect the
statusfield.- If
statusisapproved, update your internal transaction record and notify the user the payment succeeded. - If
statusisdeclined, the payment could not be approved (e.g.insufficient_funds).
- If
Widget
The Push SDK exposes aWidget that renders the card form and tokenizes the card. Instantiate it with the url returned by create-user-url, rendering it into an element on your payment page. The widget validates the card as the user types and invokes onValid when the form is complete; enable your submit button there.
widget.tokenize() to generate a token, then send it to your backend to authorize the payment.
Stored credentials
After a user’s first payment, their card is stored as a reusable credential. A returning user can pay without re-entering card details — skip the widget and let them select a previously-stored credential instead.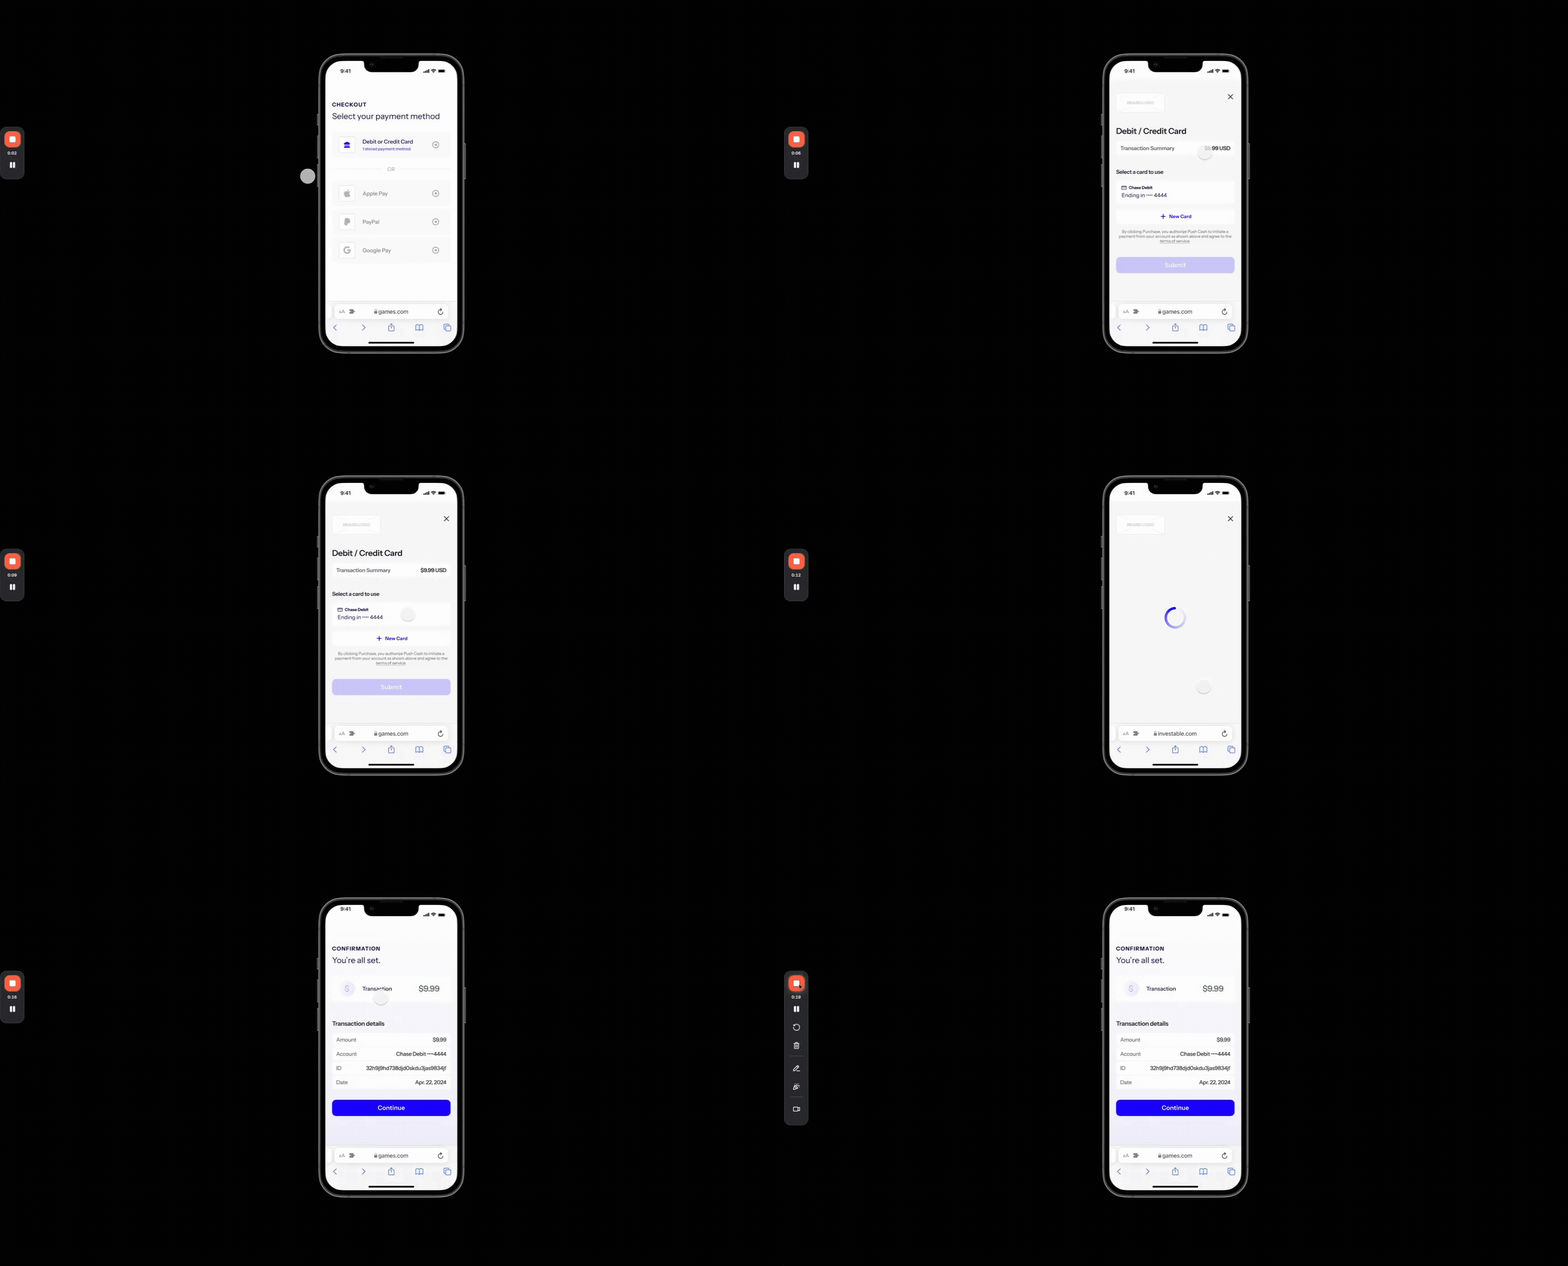
-
List and display the stored credentials. Call the list-user-credentials endpoint with the user’s
idand thetypevalues for the payment. For deposits, passsecure_debit,card_only_credit, andcard_only_debitas the allowed types; for withdrawals, passsecure_debit. Display each returned credential’scard_brandandcard_last4and allow the user to select which card to use. -
Authorize with the
credential_id. Call authorize-payment with the selectedcredential_id(instead of a widgettoken), the payment details, and aredirect_url. Handle the response by its HTTP status code exactly as in the Integration overview. -
Direct the user to complete authentication. If authorization returns
202 Accepted, navigate the user to the returnedurl— authentication may be requested even for a stored credential. See Presenting the authentication UI. -
Retrieve the result. Call the get-an-intent endpoint and inspect
statusto confirm the payment wasapprovedordeclined.
Authorize With Credential ID
Withdrawals
The steps above collect a payment (cash_in). To pay a user out, follow the same five-step flow with direction: cash_out and the differences below.
-
Restrict the widget to debit cards. Withdrawals settle to a bank account, so they require a
secure_debitcredential — a debit card with a linked account. When collecting a new card for a withdrawal, passtype: secure_debitto create-user-url so the widget only accepts debit cards. For a returning user, list stored credentials with?type=secure_debitbefore presenting the selection UI (see Stored credentials). -
Authorize with
direction: cash_out. Call authorize-payment withdirection: cash_out. Optionally setapproval_mode: manualto hold the approved withdrawal for review instead of posting it to the network automatically — see Reviewing withdrawals. -
Direct the user to complete authentication. Identical to a deposit — when the authorization returns
202 Accepted, navigate the user to the returnedurl. See Presenting the authentication UI. -
Retrieve the result. Call get-an-intent and inspect
status. A withdrawal authorized withapproval_mode: manualreturnsstatus: pending— Push has approved it, but it is not posted to the network until you approve it. -
(Optional) Approve the payment. If you authorized with
approval_mode: manual, approve the pending intent to post it to the network — see Reviewing withdrawals.
Create User URL (Withdrawal)
Reviewing withdrawals
Settingapproval_mode: manual on a cash_out authorization holds the approved withdrawal in a pending state so your team can review it before funds are posted to the network. Review the intent with get-an-intent, then either approve it to post the payment or cancel it.
Automatic posting can only be disabled for
cash_out payments. Always approve or cancel manual withdrawals so every intent reaches a terminal status and is not left pending indefinitely.Authorize Withdrawal (Manual Approval)
Approve Pending Intent
Cancel Pending Intent
Refunds
Return funds to a user by refunding an approvedcash_in intent.
-
Submit the refund. Call the create-refund endpoint with the
intent_idof the payment you want to refund.- Optionally include an
amountto refund a portion of the intent. Ifamountis omitted, the full intent amount is refunded. - Only one refund is allowed per intent — subsequent refund attempts on the same intent return a
200with the already-created refund.
To check whether an intent has already been refunded, call get-an-intent and inspect therefundfield on the response. - Optionally include an
-
Handle the response. Check the HTTP status code:
200 OK— the refund was created.401 Unauthorized— the refund was declined by the payment network. The response body includes theidof the declined refund.400 Bad Request— a validation error (e.g. the refundamountis greater than the intent amount).
Create Refund (full amount)
Create Refund (partial amount)
Disputes
A dispute records a completed payment that the payer’s bank or card issuer is attempting to reverse. When a cardholder charges back a card payment, or a receiving bank returns an ACH entry, Push opens a dispute against the original intent so you have a single object to track the challenge and its outcome. Each dispute is tied to exactly one intent, and it also appears on the Ledger as adispute-type transaction that reverses the original funds.
Push opens a dispute from two sources, in both cases taking the disputed amount and a network reason code from the reversal:
- Card chargebacks — a cardholder or issuer disputes a card payment. The
codeis the card-network reason code, for example4853(Cardholder Dispute) or13.1(Merchandise or Services Not Received). - ACH returns — the receiving bank returns an ACH entry rather than honoring it. The
codeis the ACH return code, for exampleR01(Insufficient Funds) orR02(Account Closed).
created state and stays there while the challenge is worked. Card chargebacks can be contested through representment — Push submits evidence to the issuer on your behalf — and ACH returns may be retried. Push manages that process; the dispute stays created until the network reaches a decision, at which point it moves to a terminal state.
Track disputes through both a push and a pull path:
dispute.createdwebhook (push). When a dispute is opened against one of your intents, Push sends a signeddispute.createdevent to the webhook endpoint you configured on the originating payment — the signal to listen for so you learn about a chargeback or return without polling.- Dispute API (pull). Fetch a single dispute with get-a-dispute, or query them with list-disputes filtering by
status,code,type, and creation time. The current dispute is also embedded as thedisputefield on the get-an-intent response.
Presenting the authentication UI
When authorize-payment returns202 Accepted, present the authentication UI hosted at the returned url. Choose the presentation based on how the user accesses your application:
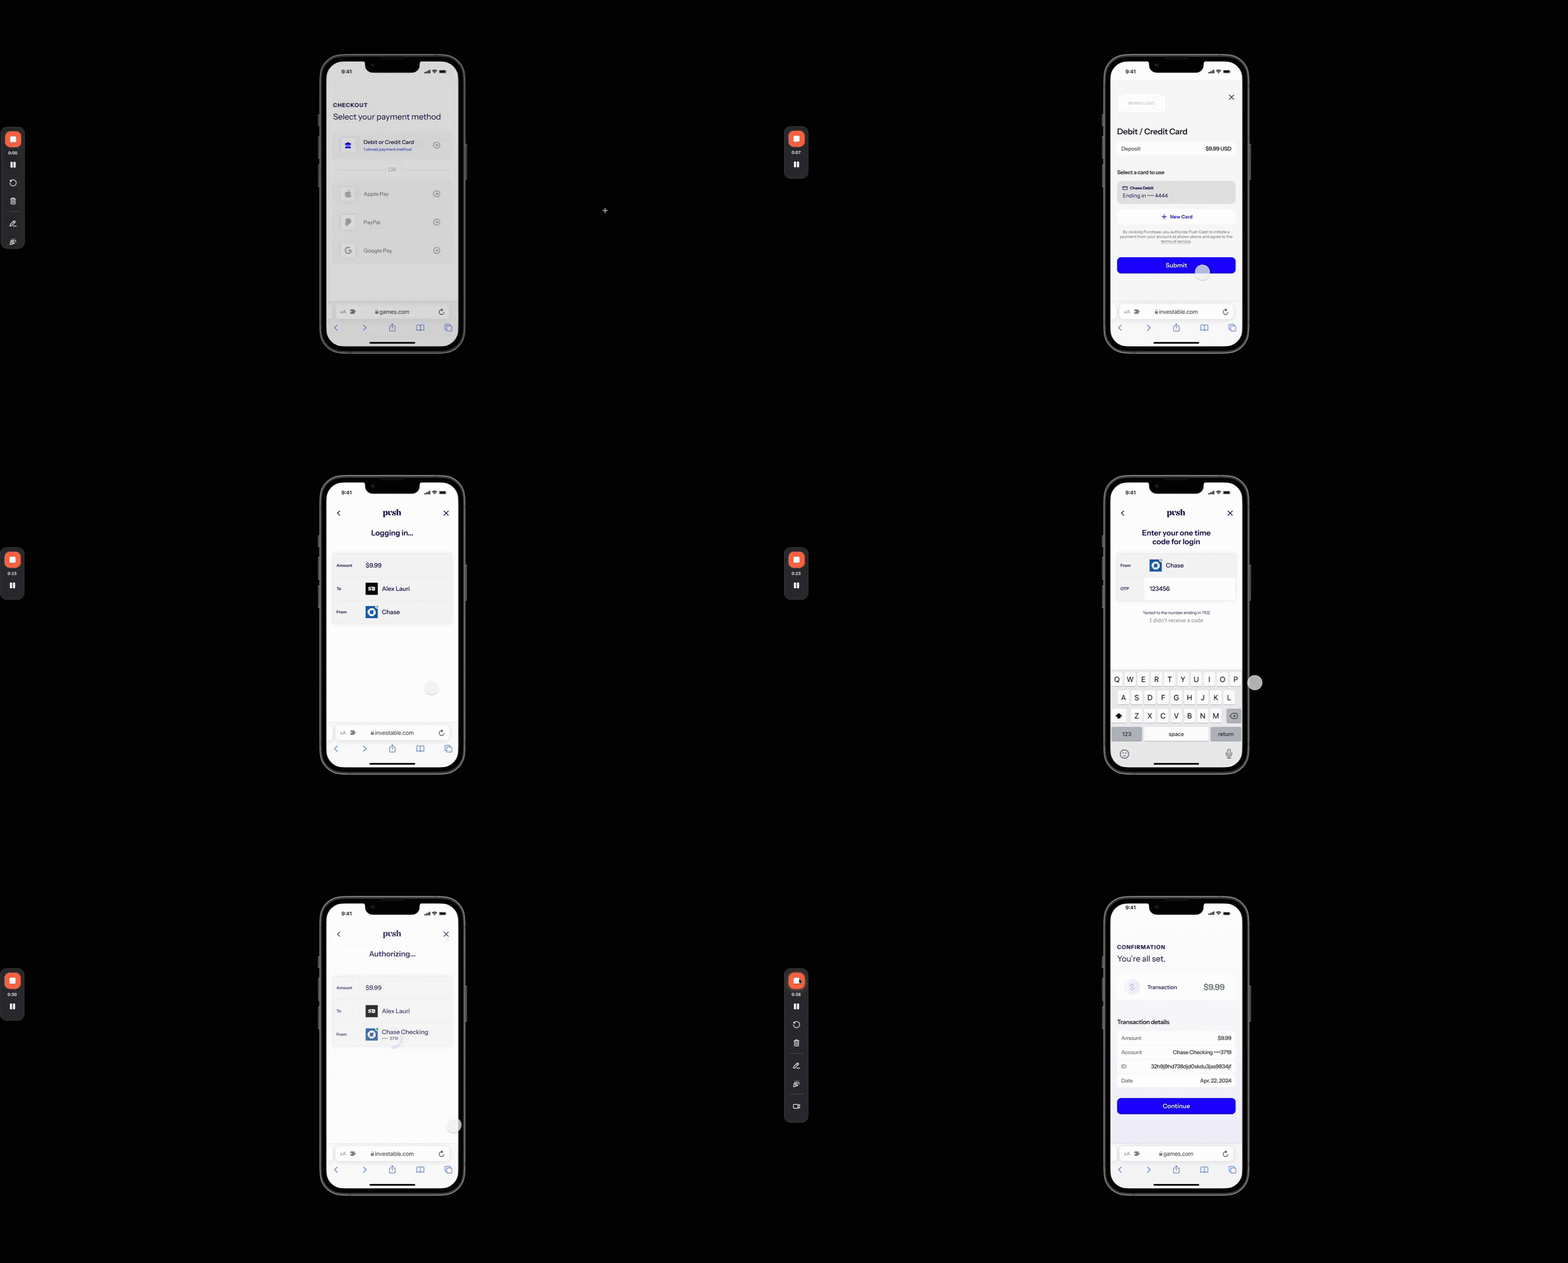
- Web (mobile or desktop): use the Push JS SDK’s
UXto present the Push-hosted UI in a modal, and omitredirect_urlfrom the authorization request. It fires youronExitcallback when the flow ends. - Native mobile app: open the authentication URL in the device’s default system browser (Safari on iOS, Chrome on Android). Set
redirect_urlon the authorization request to bring the user back to your app when authentication completes.
pushcash://) or a Universal Link / App Link as your redirect_url so the system browser can hand control back to your app.
On the web, pass the intent id from the 202 response to UX and open the modal. onExit fires once when the flow ends — the user either completes or dismisses it — at which point you confirm the outcome with get-an-intent:
Sandbox testing
Work through the following against the sandbox host (sandbox.pushcash.com) before requesting production access:
- Register each user only once and reuse their
idon subsequent transactions - Simulate an approved transaction using test card
5555 5555 5555 4444 - Simulate a declined transaction using test card
5999 9919 6976 9266 - Test an authentication-required (
202 Accepted) response using test card6011 0009 9013 9424, and confirm you persist the intentidand present the authentication UI aturl - Test a payment decline after the user completes authentication using test card
5999 9819 6976 9283 - Add a new card, then submit a second transaction using the stored
credential_id - Verify that only
secure_debitcredentials are presented for withdrawals - Process a withdrawal (
cash_out) with asecure_debitcard, then authorize withapproval_mode: manualand approve the pending intent - Refund an approved intent, and test a partial refund by specifying an
amountless than the original intent amount - Test a refund decline by processing an intent with test card
5999 9619 6976 9301and then submitting a refund