Overview
On iOS, your app presents the payment sheet directly with PassKit under your own Apple merchant ID. After the user authorizes, your app receives an encryptedPKPaymentToken; your backend exchanges it for a Push token with the tokens API and authorizes the payment.
The Apple Pay payload is encrypted by Apple to a payment processing certificate held by Push. Your app and your servers forward it as ciphertext and never handle raw card numbers.
Configuration
Apple requires the merchant ID used in an app to belong to the Apple Developer team that signs the app. This is a one-time setup, completed together with Push Cash:-
Create a merchant ID in your Apple Developer account. In Certificates, Identifiers & Profiles, create a merchant identifier (for example,
merchant.com.your-company.cashier). -
Add the Apple Pay capability to your app. In Xcode, add the Apple Pay capability to your app target and select the merchant ID. This places it in the app’s
com.apple.developer.in-app-paymentsentitlement. - Issue the payment processing certificate with Push. Push generates the key pair and sends you a certificate signing request (CSR). Upload the CSR under your merchant ID in the Apple developer console (Apple Pay Payment Processing Certificate) and share the issued certificate with your Push Cash representative.
Apple Pay payment processing certificates are valid for 25 months. Push will work with you to re-provision a fresh payment processing cert before expiration.
Integration overview
The steps below show an overview of how to accept an Apple Pay deposit from your iOS app.-
Register the user. Call the create-user endpoint with the user’s name, email, address, and phone number.
- Store the returned Push
idalongside your internal user record. - Register each user only once and reuse the user’s
idon every subsequent transaction.
- Store the returned Push
-
Present the payment sheet. Build a
PKPaymentRequestwith your merchant ID,merchantCapabilities: [.threeDSecure], the card networks enabled for your account, and the payment amount, then present aPKPaymentAuthorizationController. See Payment sheet.- Check
PKPaymentAuthorizationController.canMakePayments()and render the Apple Pay button only when it returnstrue. For styling and placement, follow Apple’s design guidelines.
- Check
-
Tokenize the payment. When the user authorizes with Face ID or Touch ID, your delegate receives a
PKPaymentcontaining the encryptedPKPaymentToken. Send it to your backend, and exchange it for a Push token by calling the tokenize endpoint on the tokens domain with the user’sid,type: "apple_pay", and the serialized token asapple_pay_token.- The token’s
transactionIdentifieracts as an idempotency key — submitting the samePKPaymentTokentwice returns the same Push token.
- The token’s
-
Authorize the payment. Pass the returned
token, along with theamount,currency, anddirection: "cash_in", to the authorize-payment endpoint from your backend, then return the result to your app and complete the payment sheet by passing aPKPaymentAuthorizationResultto the delegate’s completion handler.
Payment sheet
Present the payment sheet from your app with aPKPaymentRequest. The merchant ID must match your app’s entitlement (see Configuration).
Withdrawals
A returning user can withdraw funds to a debit card they previously deposited with via Apple Pay — no re-authentication through the payment sheet is required. Users must have completed at least one deposit through the flow above before a withdrawal credential is available.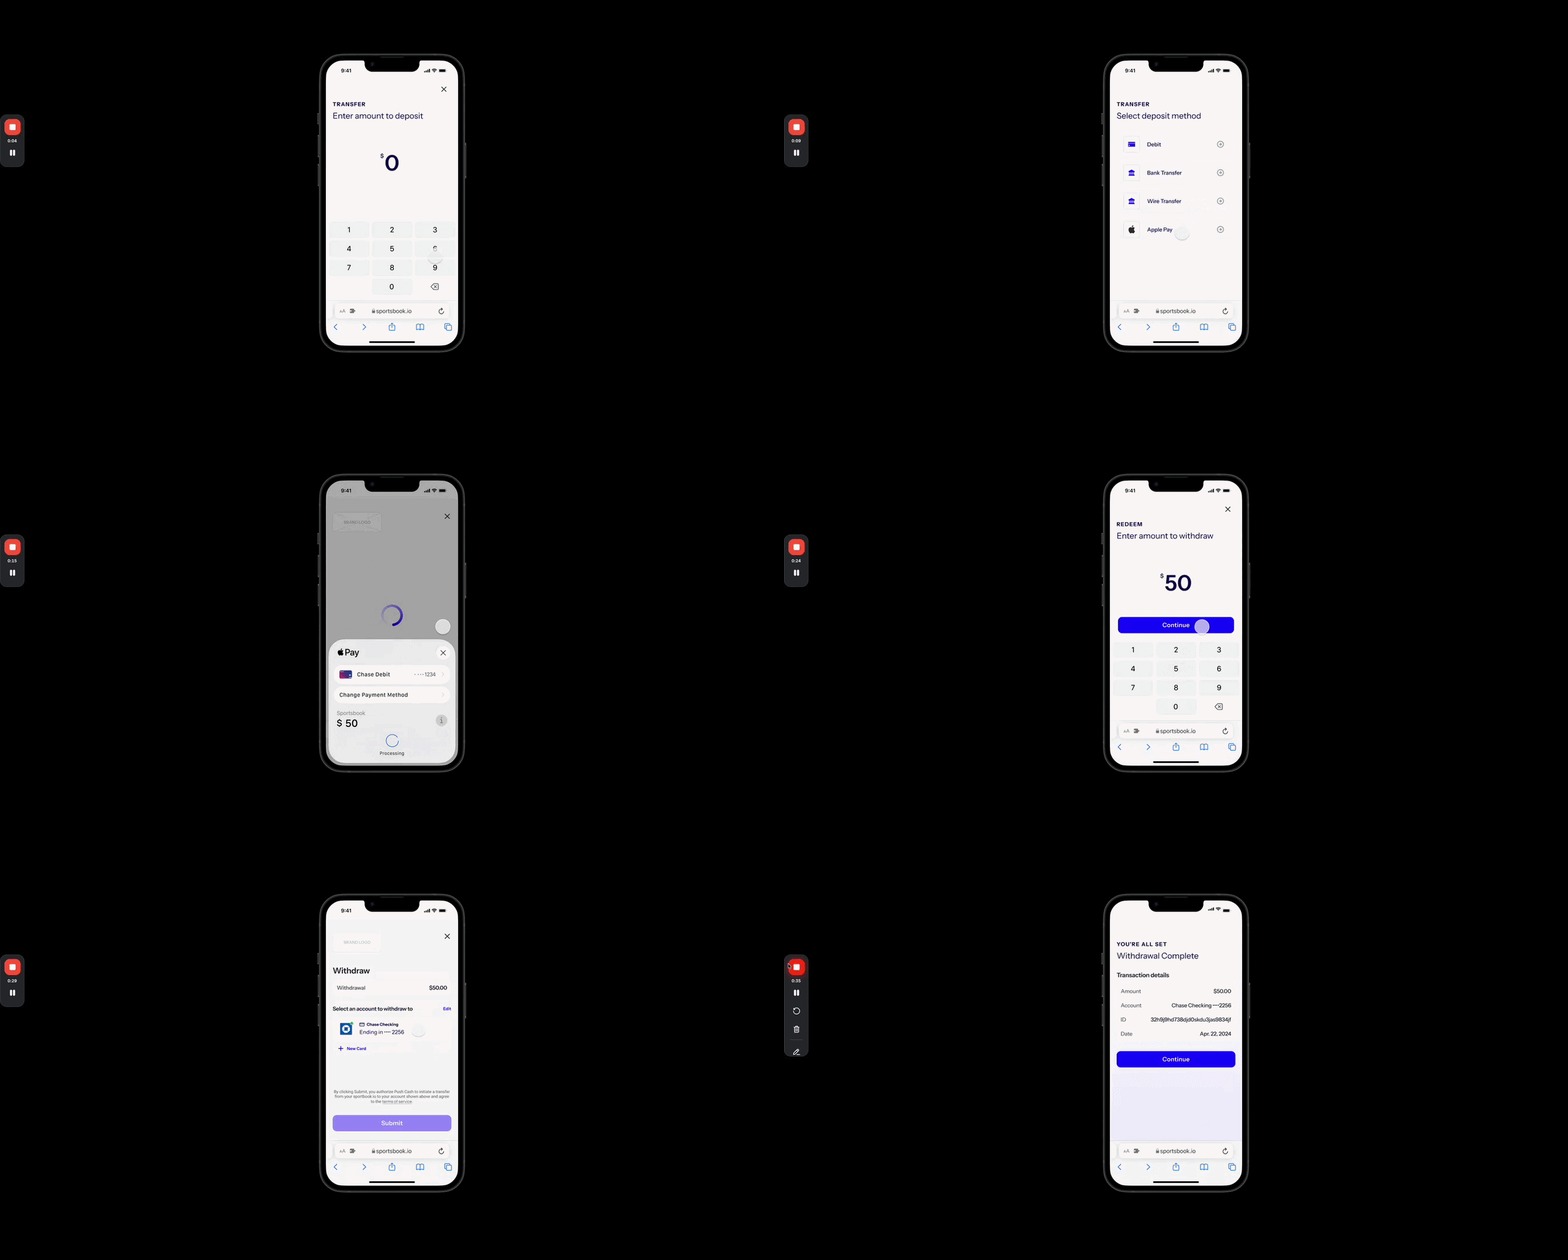
-
Display stored credentials. Call the list-user-credentials endpoint with the user’s ID, passing
apple_pay_debitas atypequery parameter (?type=apple_pay_debit). Render the returned credentials so the user can pick which card to withdraw to.- Only deposits made with a debit card create an
apple_pay_debitcredential. Deposits made with a credit card do not create a withdrawal-eligible credential.
- Only deposits made with a debit card create an
-
Submit the withdrawal. Call the authorize-payment endpoint with the selected
credential_id,direction: cash_out, and theamount.- A
200response means the withdrawal was approved — display the result to the user. - Handle a
401response. In a small number of cases the debit card does not support OCT (Original Credit Transactions), which are required to push funds to a card. This is determined by the card issuer and cannot be resolved for that card — prompt the user to select or add a different debit card.
- A
Sandbox testing
Test the full flow against the sandbox host (sandbox.pushcash.com) before going live. To exercise the payment sheet on the web, deploy your sandbox cashier to a verified HTTPS domain (see Domain registration) — Apple Pay cannot run on localhost. In an app, test on a physical device signed in to an Apple sandbox tester account — the iOS simulator does not produce real encrypted payment data.
In sandbox, simulate a declined authorization by submitting for 2200 cents ($22.00). Any other amount is approved. This applies to both deposit authorizations and withdrawal OCT declines.
Simulating a stored credential
To test withdrawals without performing a real Apple Pay deposit, create a storedapple_pay_debit credential with synthetic card data using the simulate-credential endpoint:
cash_out payments. The endpoint is available in sandbox alone.
Integration checklist
Work through the following before requesting production access:- Simulate an approved deposit by submitting a payment for $10.00
- Simulate a declined deposit by submitting a payment for $22.00
- Create an
apple_pay_debitcredential using the simulate-credential endpoint, verify it is returned by list-user-credentials with?type=apple_pay_debitand displayed withcard_last4, and test a withdrawal to it - Test an OCT decline by submitting a
cash_outfor2200cents ($22.00) against anapple_pay_debitcredential
Next steps
- Set up webhooks to receive asynchronous updates about payment status — see the enabling webhooks guide.
- Move your integration from sandbox to production with the Go-Live Checklist.