> ## Documentation Index
> Fetch the complete documentation index at: https://docs.pushcash.com/llms.txt
> Use this file to discover all available pages before exploring further.
# Card Payments
## Overview
This guide covers the core card payment integration end to end: registering a user, collecting their card through the Push Widget, authorizing a transaction, handling step-up authentication when the authorization engine requires it, and retrieving the final result. The widget renders and tokenizes the card, so your integration is limited to generating a URL, tokenizing through the widget, and authorizing against the Push API.
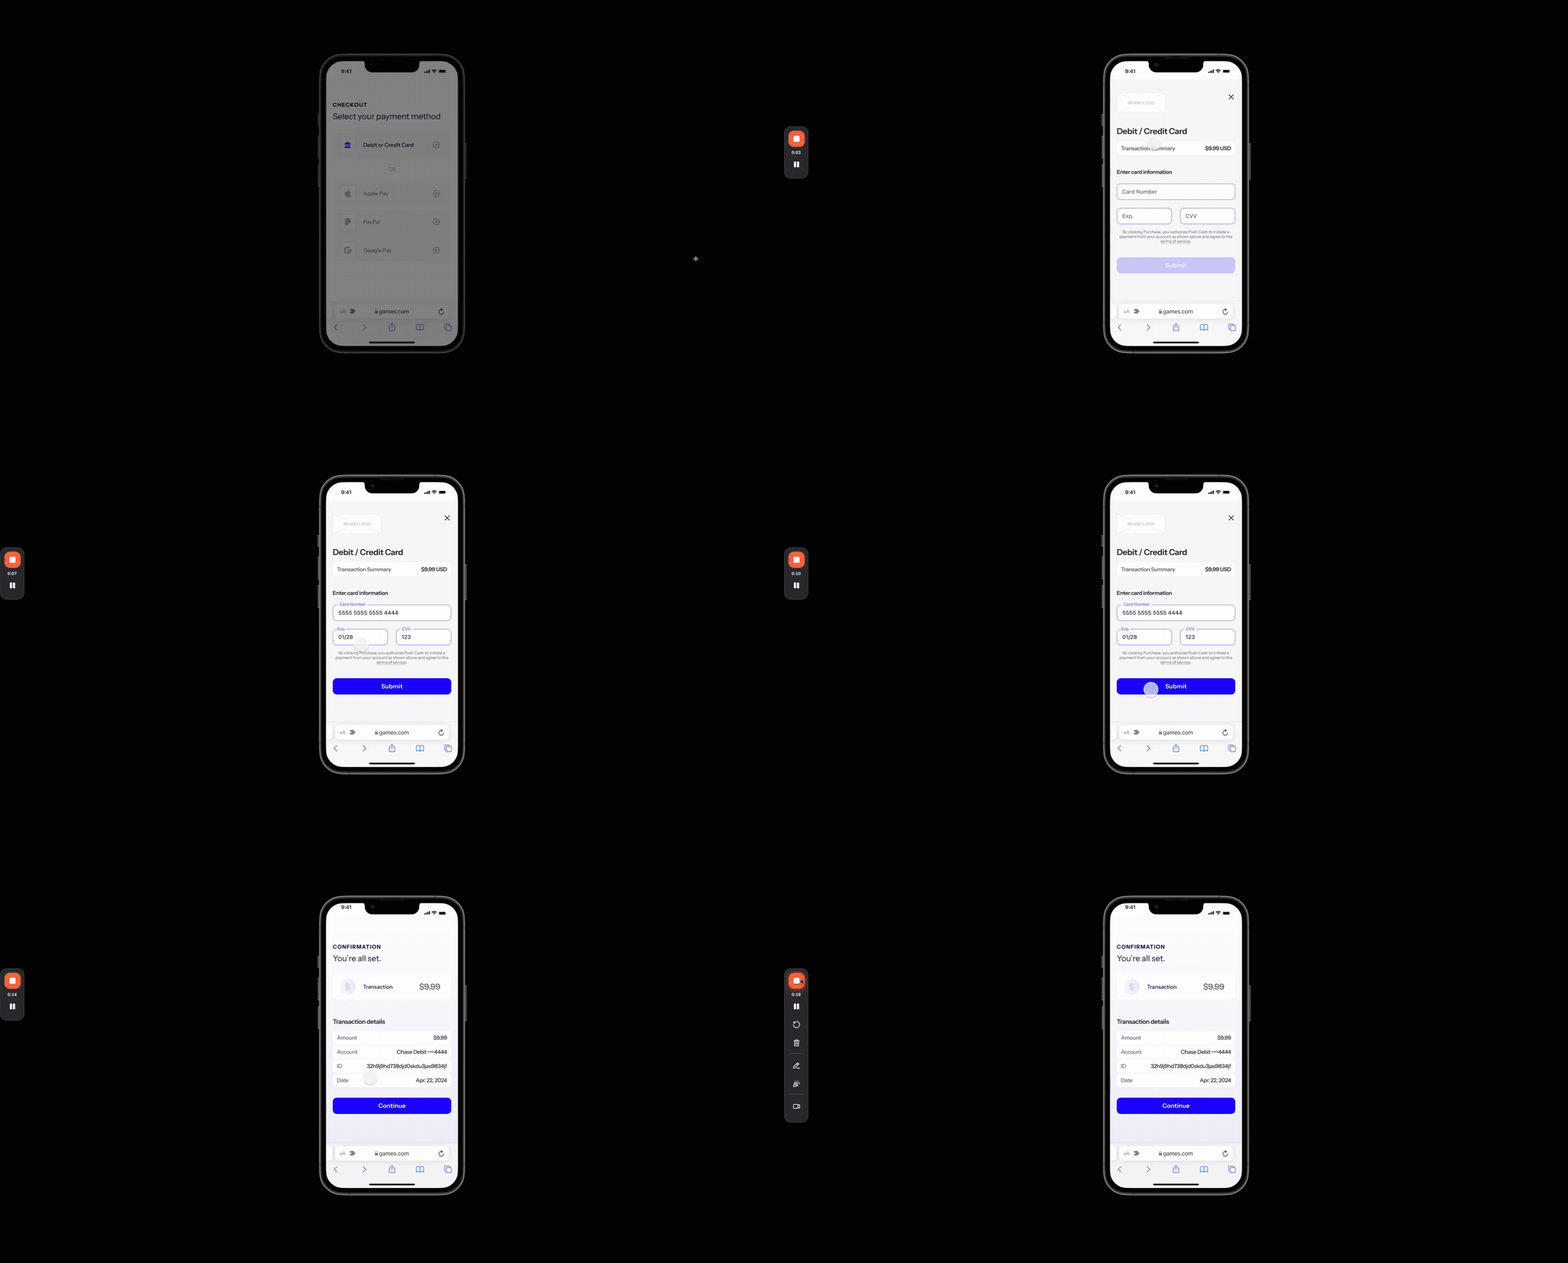 Once a user has paid, their card is stored as a reusable credential. Returning users can pay with a previously-stored credential instead of re-entering card details — see [Stored credentials](#stored-credentials).
The same flow also pays users out: to process a withdrawal (`cash_out`), see [Withdrawals](#withdrawals).
## Integration overview
The steps below show an overview of how to process a card payment.
1. **Register the user.** Call the [create-user](./apireference/user/create-user) endpoint with the user's identity information (name, email, address, and phone number).
* Store the returned Push `id` alongside your internal user record.
* Register each user **only once** and reuse the `id` on every subsequent transaction. Provide your internal user identifier in the `tag` field to ensure [idempotency](./api#idempotency).
2. **Display the widget.** Call the [create-user-url](./apireference/user/create-user-url) endpoint with the user's `id` and payment `direction`, then render the [widget](#widget) to your payment page using the returned `url`.
* The widget automatically validates the card and invokes the `onValid` callback when the form is complete — enable your submit button there.
* For a returning user, you can skip the widget and let them pay with a previously-stored credential instead. See [Stored credentials](#stored-credentials).
3. **Authorize the transaction.** When the user submits, generate a `token` from the widget (or use a stored `credential_id`) and call the [authorize-payment](./apireference/authorization/authorize-payment) endpoint with the payment details (`amount`, `currency`, `direction`), the `token`, and a `redirect_url`. Handle the response by its HTTP status code:
* **`202 Accepted`** — the user must complete authentication. Persist the returned intent `id`, then continue to step 4 using the returned `url`.
* **`200 OK`** — the payment was approved immediately. Notify the user that the payment succeeded.
* **`401 Unauthorized`** — the payment was declined.
If your organization is assigned **multiple settlement accounts**, include the relevant `account_id` on every authorization request — retrieve the list with [list-accounts](./apireference/accounts/list-accounts). Omitting `account_id` while multiple accounts exist will fail the request. Organizations with a single settlement account can ignore this.
4. **Direct the user to complete authentication.** Navigate the user to the `url` returned from the authorize call. When the flow completes, the user is returned to your application via the `redirect_url` you set on the authorize request. Present the authentication UI in an iframe or the device's system browser depending on your environment — see [Presenting the authentication UI](#presenting-the-authentication-ui).
5. **Retrieve the result.** Call the [get-an-intent](./apireference/intent/get-an-intent) endpoint and inspect the `status` field.
* If `status` is `approved`, update your internal transaction record and notify the user the payment succeeded.
* If `status` is `declined`, the payment could not be approved (e.g. `insufficient_funds`).
```bash Create User theme={null}
curl --request POST \
--url https://sandbox.pushcash.com/user \
--header 'Authorization: Bearer ' \
--header 'Content-Type: application/json' \
--data '
{
"name": {
"first": "Alfred",
"last": "Hitchcock"
},
"email": "alfred@imdb.com",
"address": {
"address_line_1": "1609 10th Ave",
"locality": "Bodega Bay",
"administrative_area": "CA",
"postal_code": "94923",
"country": "US"
},
"date_of_birth": "1899-08-13",
"government_id": {
"type": "passport",
"last4": "7349"
},
"phone_number": "(555) 681-3485",
"tag": "4c8e6b4f",
"identity_verified": true
}
'
```
```bash Create User URL theme={null}
curl --request POST \
--url https://sandbox.pushcash.com/user/{id}/url \
--header 'Authorization: Bearer ' \
--header 'Content-Type: application/json' \
--data '
{
"direction": "cash_in"
}
'
```
```bash List User Credentials theme={null}
curl --request GET \
--url https://sandbox.pushcash.com/user/{id}/credentials \
--header 'Authorization: Bearer '
```
```bash Authorize Payment theme={null}
curl --request POST \
--url https://sandbox.pushcash.com/authorize \
--header 'Authorization: Bearer ' \
--header 'Content-Type: application/json' \
--data '
{
"amount": 2500,
"currency": "USD",
"direction": "cash_in",
"tag": "your-internal-transaction-record-id",
"token": "token_mbDRHFi3dxIZEtykHsgUGC",
"redirect_url": "https://yourapp.com/payment/complete"
}
'
```
```bash Get Intent theme={null}
curl --request GET \
--url https://sandbox.pushcash.com/intent/intent_sandbox_dMggQ93ZYH6DH9LBhVeijE \
--header 'Authorization: Bearer '
```
```json Create User - 200 OK theme={null}
{
"id": "user_lVpbPL0K1XIiHx0DxipRbD"
}
```
```json Create User URL - 200 OK theme={null}
{
"url": "https://cdn.pushcash.com/widget/?param=1¶m=2¶m=3"
}
```
```json List User Credentials - 200 OK theme={null}
{
"data": [
{
"id": "cred_7YlA9IiSl8UZvNwNSbFajV",
"created_at": "2023-05-24T20:15:18.158Z",
"card_last4": "4444",
"authenticated": true,
"type": "secure_debit",
"account_last4": "0685",
"bank_name": "Chase Bank"
},
{
"id": "cred_8ZlB0JjTm9VZaOxOTcGbkW",
"created_at": "2023-05-25T10:20:30.123Z",
"card_last4": "1234",
"authenticated": true,
"type": "card_only_credit",
"account_last4": null,
"bank_name": null
}
]
}
```
```json Authorize - 200 OK (Approved) theme={null}
{
"id": "intent_sandbox_mbDRHFi3dxIZEtykHsgUGC",
"amount": 2500,
"direction": "cash_in",
"currency": "USD",
"credential": {
"display_name": "Chase Checking",
"last4": "6018"
}
}
```
```json Authorize - 202 Accepted (Authentication Required) theme={null}
{
"id": "intent_sandbox_dMggQ93ZYH6DH9LBhVeijE",
"url": "https://cdn.pushcash.com/ux/intent_sandbox_dMggQ93ZYH6DH9LBhVeijE"
}
```
```json Authorize - 401 Unauthorized (Declined) theme={null}
{
"id": "intent_sandbox_mbDRHFi3dxIZEtykHsgUGC",
"status": "declined",
"decline_reason": "insufficient_funds"
}
```
```json Get Intent - Approved theme={null}
{
"id": "intent_sandbox_dMggQ93ZYH6DH9LBhVeijE",
"status": "approved",
"amount": 2500,
"currency": "USD"
}
```
```json Get Intent - Declined theme={null}
{
"id": "intent_sandbox_dMggQ93ZYH6DH9LBhVeijE",
"status": "declined",
"decline_reason": "insufficient_funds"
}
```
## Widget
The Push SDK exposes a `Widget` that renders the card form and tokenizes the card. Instantiate it with the `url` returned by [create-user-url](./apireference/user/create-user-url), rendering it into an element on your payment page. The widget validates the card as the user types and invokes `onValid` when the form is complete; enable your submit button there.
```js theme={null}
const submitButton = document.querySelector('#submit-button');
submitButton.disabled = true;
const widget = new window.PushCash.Widget({
// where to render the widget on the page
selector: '#payment-container',
// the url returned from the create-user-url endpoint
url: 'https://cdn.pushcash.com/widget/?param=1¶m=2',
// runs once the user provides valid card information
onValid: () => {
submitButton.disabled = false;
},
});
```
When the user submits, call `widget.tokenize()` to generate a token, then send it to your backend to authorize the payment.
```js theme={null}
submitButton.addEventListener('click', async () => {
try {
const { token } = await widget.tokenize();
// send token to your backend, which calls POST /authorize
await yourBackend.authorize(token);
} catch (err) {
console.error('Tokenization failed:', err.message);
}
});
```
For full widget customization (colors, padding, typography), see the [JS SDK Reference](./sdk#widget).
## Stored credentials
After a user's first payment, their card is stored as a reusable credential. A returning user can pay without re-entering card details — skip the widget and let them select a previously-stored credential instead.
Once a user has paid, their card is stored as a reusable credential. Returning users can pay with a previously-stored credential instead of re-entering card details — see [Stored credentials](#stored-credentials).
The same flow also pays users out: to process a withdrawal (`cash_out`), see [Withdrawals](#withdrawals).
## Integration overview
The steps below show an overview of how to process a card payment.
1. **Register the user.** Call the [create-user](./apireference/user/create-user) endpoint with the user's identity information (name, email, address, and phone number).
* Store the returned Push `id` alongside your internal user record.
* Register each user **only once** and reuse the `id` on every subsequent transaction. Provide your internal user identifier in the `tag` field to ensure [idempotency](./api#idempotency).
2. **Display the widget.** Call the [create-user-url](./apireference/user/create-user-url) endpoint with the user's `id` and payment `direction`, then render the [widget](#widget) to your payment page using the returned `url`.
* The widget automatically validates the card and invokes the `onValid` callback when the form is complete — enable your submit button there.
* For a returning user, you can skip the widget and let them pay with a previously-stored credential instead. See [Stored credentials](#stored-credentials).
3. **Authorize the transaction.** When the user submits, generate a `token` from the widget (or use a stored `credential_id`) and call the [authorize-payment](./apireference/authorization/authorize-payment) endpoint with the payment details (`amount`, `currency`, `direction`), the `token`, and a `redirect_url`. Handle the response by its HTTP status code:
* **`202 Accepted`** — the user must complete authentication. Persist the returned intent `id`, then continue to step 4 using the returned `url`.
* **`200 OK`** — the payment was approved immediately. Notify the user that the payment succeeded.
* **`401 Unauthorized`** — the payment was declined.
If your organization is assigned **multiple settlement accounts**, include the relevant `account_id` on every authorization request — retrieve the list with [list-accounts](./apireference/accounts/list-accounts). Omitting `account_id` while multiple accounts exist will fail the request. Organizations with a single settlement account can ignore this.
4. **Direct the user to complete authentication.** Navigate the user to the `url` returned from the authorize call. When the flow completes, the user is returned to your application via the `redirect_url` you set on the authorize request. Present the authentication UI in an iframe or the device's system browser depending on your environment — see [Presenting the authentication UI](#presenting-the-authentication-ui).
5. **Retrieve the result.** Call the [get-an-intent](./apireference/intent/get-an-intent) endpoint and inspect the `status` field.
* If `status` is `approved`, update your internal transaction record and notify the user the payment succeeded.
* If `status` is `declined`, the payment could not be approved (e.g. `insufficient_funds`).
```bash Create User theme={null}
curl --request POST \
--url https://sandbox.pushcash.com/user \
--header 'Authorization: Bearer ' \
--header 'Content-Type: application/json' \
--data '
{
"name": {
"first": "Alfred",
"last": "Hitchcock"
},
"email": "alfred@imdb.com",
"address": {
"address_line_1": "1609 10th Ave",
"locality": "Bodega Bay",
"administrative_area": "CA",
"postal_code": "94923",
"country": "US"
},
"date_of_birth": "1899-08-13",
"government_id": {
"type": "passport",
"last4": "7349"
},
"phone_number": "(555) 681-3485",
"tag": "4c8e6b4f",
"identity_verified": true
}
'
```
```bash Create User URL theme={null}
curl --request POST \
--url https://sandbox.pushcash.com/user/{id}/url \
--header 'Authorization: Bearer ' \
--header 'Content-Type: application/json' \
--data '
{
"direction": "cash_in"
}
'
```
```bash List User Credentials theme={null}
curl --request GET \
--url https://sandbox.pushcash.com/user/{id}/credentials \
--header 'Authorization: Bearer '
```
```bash Authorize Payment theme={null}
curl --request POST \
--url https://sandbox.pushcash.com/authorize \
--header 'Authorization: Bearer ' \
--header 'Content-Type: application/json' \
--data '
{
"amount": 2500,
"currency": "USD",
"direction": "cash_in",
"tag": "your-internal-transaction-record-id",
"token": "token_mbDRHFi3dxIZEtykHsgUGC",
"redirect_url": "https://yourapp.com/payment/complete"
}
'
```
```bash Get Intent theme={null}
curl --request GET \
--url https://sandbox.pushcash.com/intent/intent_sandbox_dMggQ93ZYH6DH9LBhVeijE \
--header 'Authorization: Bearer '
```
```json Create User - 200 OK theme={null}
{
"id": "user_lVpbPL0K1XIiHx0DxipRbD"
}
```
```json Create User URL - 200 OK theme={null}
{
"url": "https://cdn.pushcash.com/widget/?param=1¶m=2¶m=3"
}
```
```json List User Credentials - 200 OK theme={null}
{
"data": [
{
"id": "cred_7YlA9IiSl8UZvNwNSbFajV",
"created_at": "2023-05-24T20:15:18.158Z",
"card_last4": "4444",
"authenticated": true,
"type": "secure_debit",
"account_last4": "0685",
"bank_name": "Chase Bank"
},
{
"id": "cred_8ZlB0JjTm9VZaOxOTcGbkW",
"created_at": "2023-05-25T10:20:30.123Z",
"card_last4": "1234",
"authenticated": true,
"type": "card_only_credit",
"account_last4": null,
"bank_name": null
}
]
}
```
```json Authorize - 200 OK (Approved) theme={null}
{
"id": "intent_sandbox_mbDRHFi3dxIZEtykHsgUGC",
"amount": 2500,
"direction": "cash_in",
"currency": "USD",
"credential": {
"display_name": "Chase Checking",
"last4": "6018"
}
}
```
```json Authorize - 202 Accepted (Authentication Required) theme={null}
{
"id": "intent_sandbox_dMggQ93ZYH6DH9LBhVeijE",
"url": "https://cdn.pushcash.com/ux/intent_sandbox_dMggQ93ZYH6DH9LBhVeijE"
}
```
```json Authorize - 401 Unauthorized (Declined) theme={null}
{
"id": "intent_sandbox_mbDRHFi3dxIZEtykHsgUGC",
"status": "declined",
"decline_reason": "insufficient_funds"
}
```
```json Get Intent - Approved theme={null}
{
"id": "intent_sandbox_dMggQ93ZYH6DH9LBhVeijE",
"status": "approved",
"amount": 2500,
"currency": "USD"
}
```
```json Get Intent - Declined theme={null}
{
"id": "intent_sandbox_dMggQ93ZYH6DH9LBhVeijE",
"status": "declined",
"decline_reason": "insufficient_funds"
}
```
## Widget
The Push SDK exposes a `Widget` that renders the card form and tokenizes the card. Instantiate it with the `url` returned by [create-user-url](./apireference/user/create-user-url), rendering it into an element on your payment page. The widget validates the card as the user types and invokes `onValid` when the form is complete; enable your submit button there.
```js theme={null}
const submitButton = document.querySelector('#submit-button');
submitButton.disabled = true;
const widget = new window.PushCash.Widget({
// where to render the widget on the page
selector: '#payment-container',
// the url returned from the create-user-url endpoint
url: 'https://cdn.pushcash.com/widget/?param=1¶m=2',
// runs once the user provides valid card information
onValid: () => {
submitButton.disabled = false;
},
});
```
When the user submits, call `widget.tokenize()` to generate a token, then send it to your backend to authorize the payment.
```js theme={null}
submitButton.addEventListener('click', async () => {
try {
const { token } = await widget.tokenize();
// send token to your backend, which calls POST /authorize
await yourBackend.authorize(token);
} catch (err) {
console.error('Tokenization failed:', err.message);
}
});
```
For full widget customization (colors, padding, typography), see the [JS SDK Reference](./sdk#widget).
## Stored credentials
After a user's first payment, their card is stored as a reusable credential. A returning user can pay without re-entering card details — skip the widget and let them select a previously-stored credential instead.
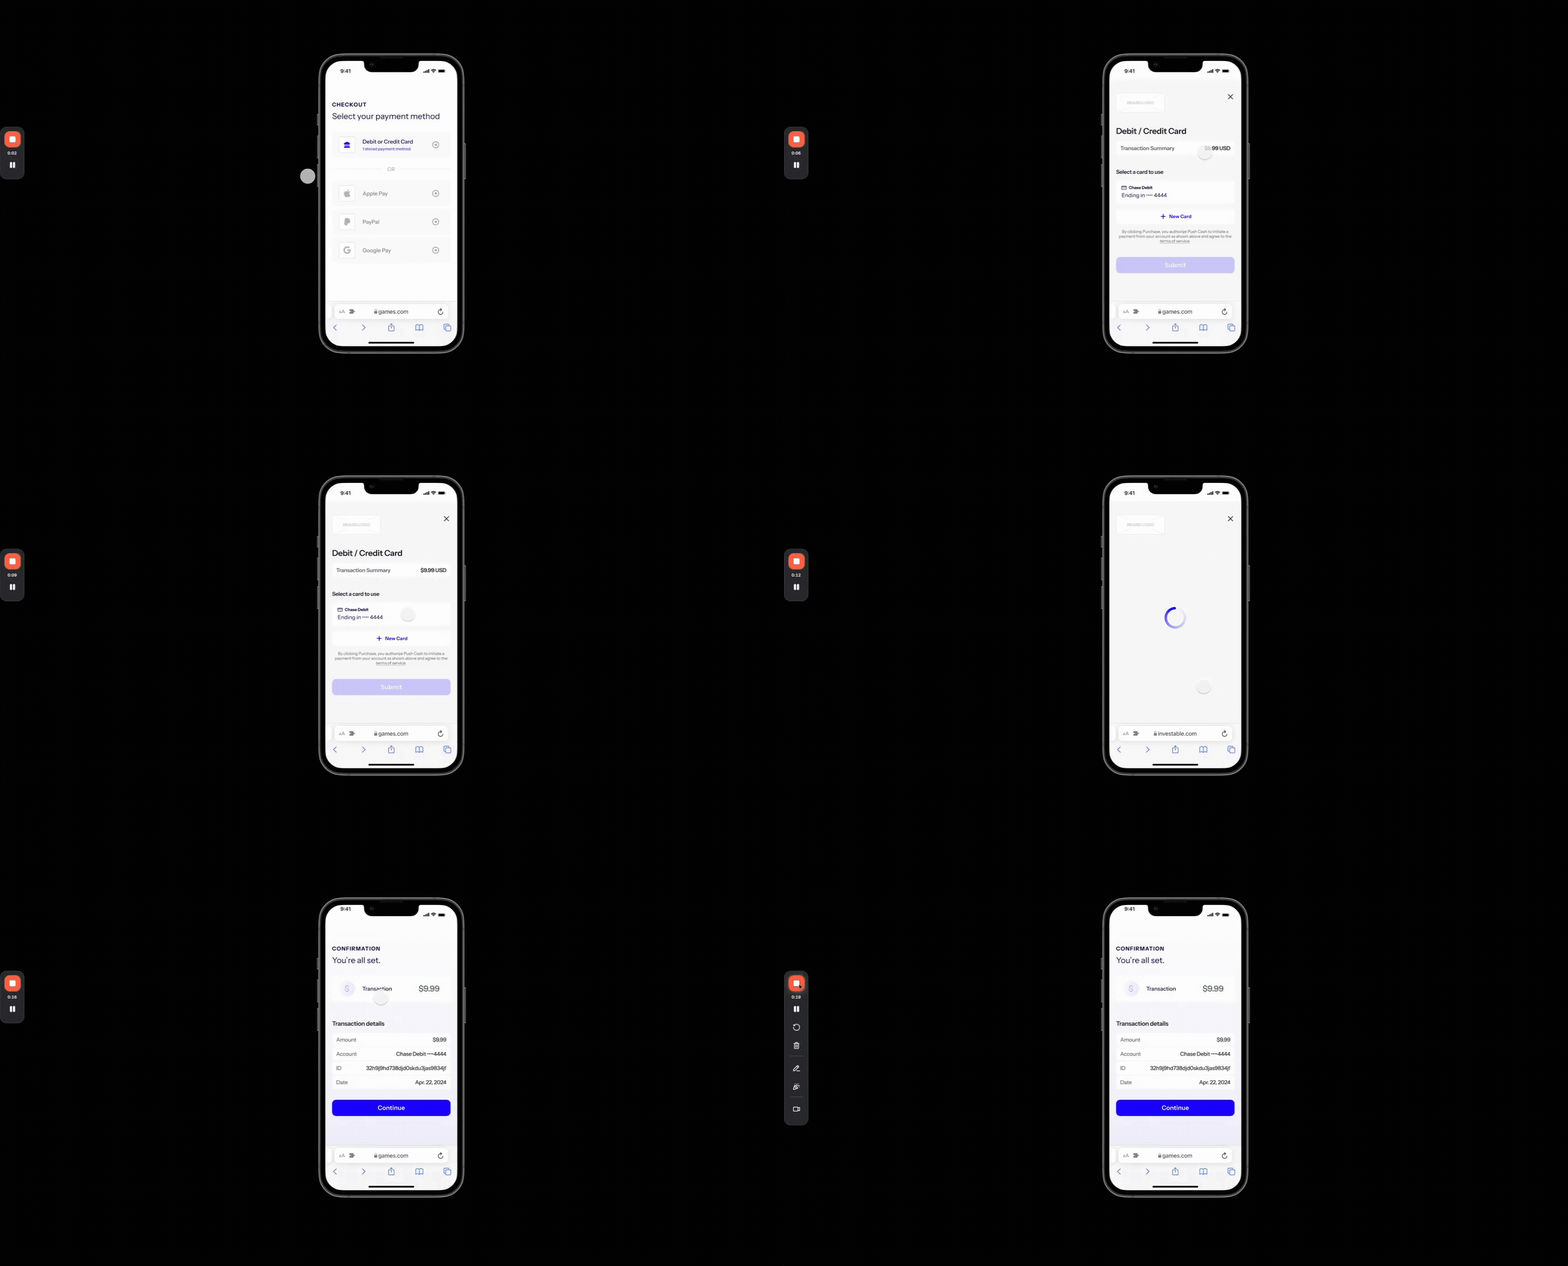 1. **List and display the stored credentials.** Call the [list-user-credentials](./apireference/user/list-user-credentials) endpoint with the user's `id` and render the returned credentials so the user can pick one. Use these fields to build an identifiable selection UI and enforce eligibility:
* **`card_last4`, `account_last4`, `bank_name`** — display these so the user recognizes the card and, where present, the linked bank account.
* **`authenticated`** — whether the credential has completed authentication.
* **`type`** — determines what the credential can be used for:
* `secure_debit` — a debit card with a linked bank account. Eligible for both deposits (`cash_in`) and withdrawals (`cash_out`).
* `card_only_debit` — a debit card with no linked account. Deposits only.
* `card_only_credit` — a credit card. Deposits only.
Only credentials with type `secure_debit` can be used for withdrawals. When the user is withdrawing funds, filter the list to `secure_debit` credentials before presenting the selection UI.
2. **Authorize with the `credential_id`.** Call [authorize-payment](./apireference/authorization/authorize-payment) with the selected `credential_id` (instead of a widget `token`), the payment details, and a `redirect_url`. Handle the response by its HTTP status code exactly as in the [Integration overview](#integration-overview).
3. **Direct the user to complete authentication.** If authorization returns `202 Accepted`, navigate the user to the returned `url` — authentication may be requested even for a stored credential. See [Presenting the authentication UI](#presenting-the-authentication-ui).
4. **Retrieve the result.** Call the [get-an-intent](./apireference/intent/get-an-intent) endpoint and inspect `status` to confirm the payment was `approved` or `declined`.
```bash Authorize With Credential ID theme={null}
curl --request POST \
--url https://sandbox.pushcash.com/authorize \
--header 'Authorization: Bearer ' \
--header 'Content-Type: application/json' \
--data '
{
"user_id": "user_lVpbPL0K1XIiHx0DxipRbD",
"credential_id": "cred_sandbox_123",
"amount": 2500,
"currency": "USD",
"direction": "cash_in"
}
'
```
## Withdrawals
The steps above collect a payment (`cash_in`). To pay a user out, follow the same five-step flow with `direction: cash_out` and the differences below.
1. **Restrict the widget to debit cards.** Withdrawals settle to a bank account, so they require a `secure_debit` credential — a debit card with a linked account. When collecting a new card for a withdrawal, pass `type: secure_debit` to [create-user-url](./apireference/user/create-user-url) so the widget only accepts debit cards. For a returning user, filter stored credentials to `secure_debit` before presenting the selection UI (see [Stored credentials](#stored-credentials)).
2. **Authorize with `direction: cash_out`.** Call [authorize-payment](./apireference/authorization/authorize-payment) with `direction: cash_out`. Optionally set `approval_mode: manual` to hold the approved withdrawal for review instead of posting it to the network automatically — see [Reviewing withdrawals](#reviewing-withdrawals).
3. **Direct the user to complete authentication.** Identical to a deposit — when the authorization returns `202 Accepted`, navigate the user to the returned `url`. See [Presenting the authentication UI](#presenting-the-authentication-ui).
4. **Retrieve the result.** Call [get-an-intent](./apireference/intent/get-an-intent) and inspect `status`. A withdrawal authorized with `approval_mode: manual` returns `status: pending` — Push has approved it, but it is not posted to the network until you approve it.
5. **(Optional) Approve the payment.** If you authorized with `approval_mode: manual`, approve the pending intent to post it to the network — see [Reviewing withdrawals](#reviewing-withdrawals).
```bash Create User URL (Withdrawal) theme={null}
curl --request POST \
--url https://sandbox.pushcash.com/user/{id}/url \
--header 'Authorization: Bearer ' \
--header 'Content-Type: application/json' \
--data '
{
"direction": "cash_out",
"type": "secure_debit"
}
'
```
### Reviewing withdrawals
Setting `approval_mode: manual` on a `cash_out` authorization holds the approved withdrawal in a `pending` state so your team can review it before funds are posted to the network. Review the intent with [get-an-intent](./apireference/intent/get-an-intent), then either [approve](./apireference/intent/approve-a-pending-intent) it to post the payment or [cancel](./apireference/intent/cancel-an-intent) it.
Automatic posting can only be disabled for `cash_out` payments. Always approve or cancel manual withdrawals so every intent reaches a terminal status and is not left `pending` indefinitely.
```bash Authorize Withdrawal (Manual Approval) theme={null}
curl --request POST \
--url https://sandbox.pushcash.com/authorize \
--header 'Authorization: Bearer ' \
--header 'Content-Type: application/json' \
--data '
{
"user_id": "user_lVpbPL0K1XIiHx0DxipRbD",
"amount": 1000,
"currency": "USD",
"direction": "cash_out",
"approval_mode": "manual",
"token": "token_mbDRHFi3dxIZEtykHsgUGC"
}
'
```
```bash Approve Pending Intent theme={null}
curl --request POST \
--url https://sandbox.pushcash.com/intent/intent_5Jun2aRUEs7xGddsARCowB/approve \
--header 'Authorization: Bearer '
```
```bash Cancel Pending Intent theme={null}
curl --request POST \
--url https://sandbox.pushcash.com/intent/intent_5Jun2aRUEs7xGddsARCowB/cancel \
--header 'Authorization: Bearer '
```
## Refunds
Return funds to a user by refunding an approved `cash_in` intent.
1. **Submit the refund.** Call the [create-refund](./apireference/refund/create-a-refund) endpoint with the `intent_id` of the payment you want to refund.
* Optionally include an `amount` to refund a portion of the intent. If `amount` is omitted, the full intent amount is refunded.
* Only one refund is allowed per intent — subsequent refund attempts on the same intent return a `200` with the already-created refund.
To check whether an intent has already been refunded, call [get-an-intent](./apireference/intent/get-an-intent) and inspect the `refund` field on the response.
A refund can be declined by the issuer if the user's bank rejects the transaction.
2. **Handle the response.** Check the HTTP status code:
* **`200 OK`** — the refund was created.
* **`401 Unauthorized`** — the refund was declined by the payment network. The response body includes the `id` of the declined refund.
* **`400 Bad Request`** — a validation error (e.g. the refund `amount` is greater than the intent amount).
```bash Create Refund (full amount) theme={null}
curl --request POST \
--url https://sandbox.pushcash.com/refund \
--header 'Authorization: Bearer ' \
--header 'Content-Type: application/json' \
--data '
{
"intent_id": "intent_R7xKpVwZ3mNqYtFh2sJcAe"
}
'
```
```bash Create Refund (partial amount) theme={null}
curl --request POST \
--url https://sandbox.pushcash.com/refund \
--header 'Authorization: Bearer ' \
--header 'Content-Type: application/json' \
--data '
{
"intent_id": "intent_R7xKpVwZ3mNqYtFh2sJcAe",
"amount": 500
}
'
```
## Presenting the authentication UI
When [authorize-payment](./apireference/authorization/authorize-payment) returns `202 Accepted`, present the authentication UI hosted at the returned `url`. Choose the presentation based on how the user accesses your application:
1. **List and display the stored credentials.** Call the [list-user-credentials](./apireference/user/list-user-credentials) endpoint with the user's `id` and render the returned credentials so the user can pick one. Use these fields to build an identifiable selection UI and enforce eligibility:
* **`card_last4`, `account_last4`, `bank_name`** — display these so the user recognizes the card and, where present, the linked bank account.
* **`authenticated`** — whether the credential has completed authentication.
* **`type`** — determines what the credential can be used for:
* `secure_debit` — a debit card with a linked bank account. Eligible for both deposits (`cash_in`) and withdrawals (`cash_out`).
* `card_only_debit` — a debit card with no linked account. Deposits only.
* `card_only_credit` — a credit card. Deposits only.
Only credentials with type `secure_debit` can be used for withdrawals. When the user is withdrawing funds, filter the list to `secure_debit` credentials before presenting the selection UI.
2. **Authorize with the `credential_id`.** Call [authorize-payment](./apireference/authorization/authorize-payment) with the selected `credential_id` (instead of a widget `token`), the payment details, and a `redirect_url`. Handle the response by its HTTP status code exactly as in the [Integration overview](#integration-overview).
3. **Direct the user to complete authentication.** If authorization returns `202 Accepted`, navigate the user to the returned `url` — authentication may be requested even for a stored credential. See [Presenting the authentication UI](#presenting-the-authentication-ui).
4. **Retrieve the result.** Call the [get-an-intent](./apireference/intent/get-an-intent) endpoint and inspect `status` to confirm the payment was `approved` or `declined`.
```bash Authorize With Credential ID theme={null}
curl --request POST \
--url https://sandbox.pushcash.com/authorize \
--header 'Authorization: Bearer ' \
--header 'Content-Type: application/json' \
--data '
{
"user_id": "user_lVpbPL0K1XIiHx0DxipRbD",
"credential_id": "cred_sandbox_123",
"amount": 2500,
"currency": "USD",
"direction": "cash_in"
}
'
```
## Withdrawals
The steps above collect a payment (`cash_in`). To pay a user out, follow the same five-step flow with `direction: cash_out` and the differences below.
1. **Restrict the widget to debit cards.** Withdrawals settle to a bank account, so they require a `secure_debit` credential — a debit card with a linked account. When collecting a new card for a withdrawal, pass `type: secure_debit` to [create-user-url](./apireference/user/create-user-url) so the widget only accepts debit cards. For a returning user, filter stored credentials to `secure_debit` before presenting the selection UI (see [Stored credentials](#stored-credentials)).
2. **Authorize with `direction: cash_out`.** Call [authorize-payment](./apireference/authorization/authorize-payment) with `direction: cash_out`. Optionally set `approval_mode: manual` to hold the approved withdrawal for review instead of posting it to the network automatically — see [Reviewing withdrawals](#reviewing-withdrawals).
3. **Direct the user to complete authentication.** Identical to a deposit — when the authorization returns `202 Accepted`, navigate the user to the returned `url`. See [Presenting the authentication UI](#presenting-the-authentication-ui).
4. **Retrieve the result.** Call [get-an-intent](./apireference/intent/get-an-intent) and inspect `status`. A withdrawal authorized with `approval_mode: manual` returns `status: pending` — Push has approved it, but it is not posted to the network until you approve it.
5. **(Optional) Approve the payment.** If you authorized with `approval_mode: manual`, approve the pending intent to post it to the network — see [Reviewing withdrawals](#reviewing-withdrawals).
```bash Create User URL (Withdrawal) theme={null}
curl --request POST \
--url https://sandbox.pushcash.com/user/{id}/url \
--header 'Authorization: Bearer ' \
--header 'Content-Type: application/json' \
--data '
{
"direction": "cash_out",
"type": "secure_debit"
}
'
```
### Reviewing withdrawals
Setting `approval_mode: manual` on a `cash_out` authorization holds the approved withdrawal in a `pending` state so your team can review it before funds are posted to the network. Review the intent with [get-an-intent](./apireference/intent/get-an-intent), then either [approve](./apireference/intent/approve-a-pending-intent) it to post the payment or [cancel](./apireference/intent/cancel-an-intent) it.
Automatic posting can only be disabled for `cash_out` payments. Always approve or cancel manual withdrawals so every intent reaches a terminal status and is not left `pending` indefinitely.
```bash Authorize Withdrawal (Manual Approval) theme={null}
curl --request POST \
--url https://sandbox.pushcash.com/authorize \
--header 'Authorization: Bearer ' \
--header 'Content-Type: application/json' \
--data '
{
"user_id": "user_lVpbPL0K1XIiHx0DxipRbD",
"amount": 1000,
"currency": "USD",
"direction": "cash_out",
"approval_mode": "manual",
"token": "token_mbDRHFi3dxIZEtykHsgUGC"
}
'
```
```bash Approve Pending Intent theme={null}
curl --request POST \
--url https://sandbox.pushcash.com/intent/intent_5Jun2aRUEs7xGddsARCowB/approve \
--header 'Authorization: Bearer '
```
```bash Cancel Pending Intent theme={null}
curl --request POST \
--url https://sandbox.pushcash.com/intent/intent_5Jun2aRUEs7xGddsARCowB/cancel \
--header 'Authorization: Bearer '
```
## Refunds
Return funds to a user by refunding an approved `cash_in` intent.
1. **Submit the refund.** Call the [create-refund](./apireference/refund/create-a-refund) endpoint with the `intent_id` of the payment you want to refund.
* Optionally include an `amount` to refund a portion of the intent. If `amount` is omitted, the full intent amount is refunded.
* Only one refund is allowed per intent — subsequent refund attempts on the same intent return a `200` with the already-created refund.
To check whether an intent has already been refunded, call [get-an-intent](./apireference/intent/get-an-intent) and inspect the `refund` field on the response.
A refund can be declined by the issuer if the user's bank rejects the transaction.
2. **Handle the response.** Check the HTTP status code:
* **`200 OK`** — the refund was created.
* **`401 Unauthorized`** — the refund was declined by the payment network. The response body includes the `id` of the declined refund.
* **`400 Bad Request`** — a validation error (e.g. the refund `amount` is greater than the intent amount).
```bash Create Refund (full amount) theme={null}
curl --request POST \
--url https://sandbox.pushcash.com/refund \
--header 'Authorization: Bearer ' \
--header 'Content-Type: application/json' \
--data '
{
"intent_id": "intent_R7xKpVwZ3mNqYtFh2sJcAe"
}
'
```
```bash Create Refund (partial amount) theme={null}
curl --request POST \
--url https://sandbox.pushcash.com/refund \
--header 'Authorization: Bearer ' \
--header 'Content-Type: application/json' \
--data '
{
"intent_id": "intent_R7xKpVwZ3mNqYtFh2sJcAe",
"amount": 500
}
'
```
## Presenting the authentication UI
When [authorize-payment](./apireference/authorization/authorize-payment) returns `202 Accepted`, present the authentication UI hosted at the returned `url`. Choose the presentation based on how the user accesses your application:
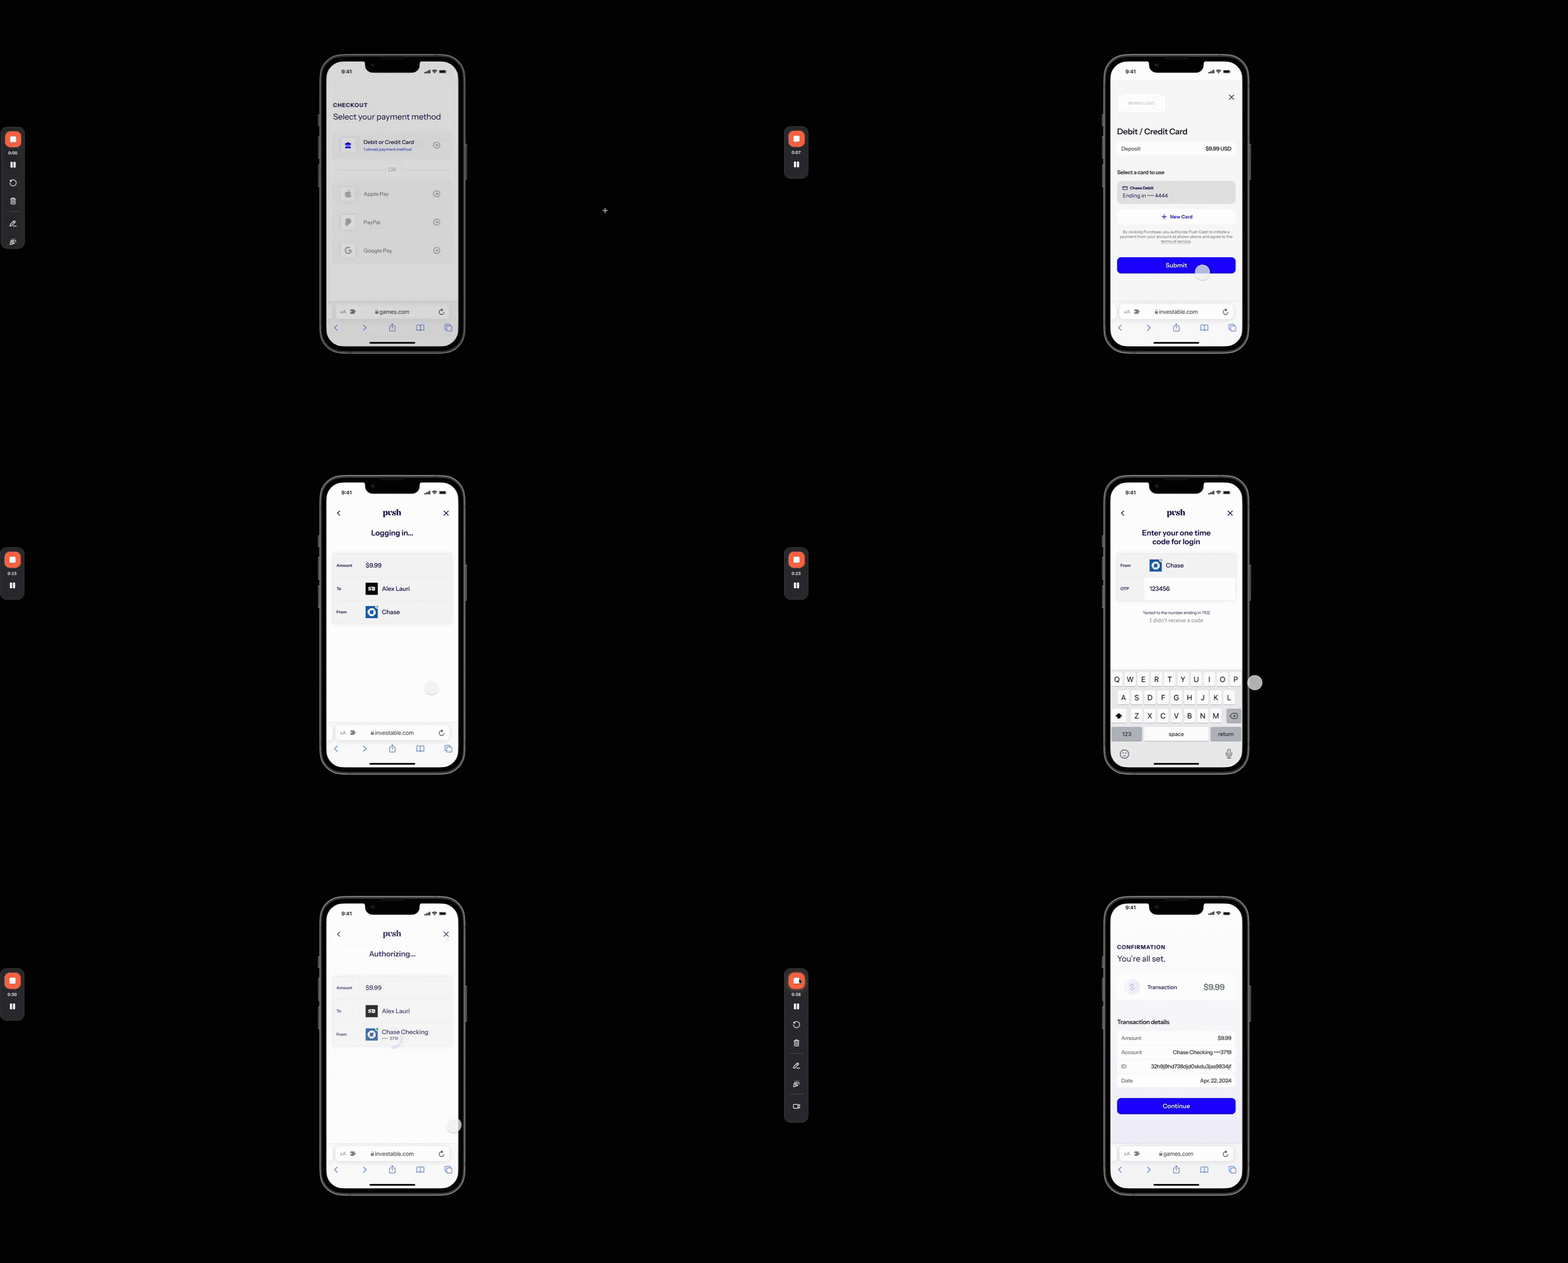 * **Web (mobile or desktop):** present the authentication UI in an iframe. The authentication UI signals the conclusion of the flow by submitting a message to the top-level browser window using [postMessage](https://developer.mozilla.org/en-US/docs/Web/API/Window/postMessage). Omit `redirect_url` from the authorization request.
* **Native mobile app:** open the authentication URL in the device's default system browser (Safari on iOS, Chrome on Android). Set `redirect_url` on the authorization request to bring the user back to your app when authentication completes.
Use a custom scheme (e.g. `pushcash://`) or a Universal Link / App Link as your `redirect_url` so the system browser can hand control back to your app.
```mermaid theme={null}
flowchart TD
A[User needs to complete step-up authentication] --> B{Is user accessing the payment page via a standard browser environment which supports opening additional windows / browser tabs?}
B -- Yes --> C[**Use iframe**
* **Web (mobile or desktop):** present the authentication UI in an iframe. The authentication UI signals the conclusion of the flow by submitting a message to the top-level browser window using [postMessage](https://developer.mozilla.org/en-US/docs/Web/API/Window/postMessage). Omit `redirect_url` from the authorization request.
* **Native mobile app:** open the authentication URL in the device's default system browser (Safari on iOS, Chrome on Android). Set `redirect_url` on the authorization request to bring the user back to your app when authentication completes.
Use a custom scheme (e.g. `pushcash://`) or a Universal Link / App Link as your `redirect_url` so the system browser can hand control back to your app.
```mermaid theme={null}
flowchart TD
A[User needs to complete step-up authentication] --> B{Is user accessing the payment page via a standard browser environment which supports opening additional windows / browser tabs?}
B -- Yes --> C[**Use iframe**
- Omit redirect_url from authorization request
- Listen for postMessage for when to remove iframe from DOM]
B -- No --> D{Is the user accessing the payment page via a
native mobile app?}
D -- Yes --> E[**Use redirect**
- Set redirect_url parameter in authorization request
- Open the authentication URL in the device's default system browser
]
D -- No --> F[Default to iframe
Omit redirect_url]
```
## Sandbox testing
Work through the following against the sandbox host (`sandbox.pushcash.com`) before requesting production access:
* Register each user only once and reuse their `id` on subsequent transactions
* Simulate an approved transaction using test card `5555 5555 5555 4444`
* Simulate a declined transaction using test card `5999 9919 6976 9266`
* Test an authentication-required (`202 Accepted`) response using test card `6011 0009 9013 9424`, and confirm you persist the intent `id` and present the authentication UI at `url`
* Test a payment decline after the user completes authentication using test card `5999 9819 6976 9283`
* Add a new card, then submit a second transaction using the stored `credential_id`
* Verify that only `secure_debit` credentials are presented for withdrawals
* Process a withdrawal (`cash_out`) with a `secure_debit` card, then authorize with `approval_mode: manual` and approve the pending intent
* Refund an approved intent, and test a partial refund by specifying an `amount` less than the original intent amount
* Test a refund decline by processing an intent with test card `5999 9619 6976 9301` and then submitting a refund
## Next steps
Now that you can process card payments, set up webhooks to receive asynchronous updates on the final payment result — see the [enabling webhooks](./enabling-webhooks) guide.