> ## Documentation Index
> Fetch the complete documentation index at: https://docs.pushcash.com/llms.txt
> Use this file to discover all available pages before exploring further.
# Apple Pay Web
## Overview
On the web, the Push SDK handles presenting the payment sheet and processing the payment data received from Apple after the user authenticates and completes the payment. Your integration is responsible for displaying the Apple Pay button, initializing the SDK, and supplying the resulting token to the Push API to authorize the payment.
Apple Pay on the web requires your site to be served over HTTPS on a domain that Apple has verified. As a result, this integration cannot be tested on `localhost`, and each domain that displays the Apple Pay button must be verified first. See [Domain registration](#domain-registration) and Apple's [Setting up your server](https://developer.apple.com/documentation/applepayontheweb/setting-up-your-server) guide.
## Integration overview
The steps below show an overview of how to accept an Apple Pay deposit.
1. **Register the user.** Call the [create-user](./apireference/user/create-user) endpoint with the user's name, email, address, and phone number.
* Store the returned Push `id` alongside your internal user record.
* Register each user **only once** and reuse the user's `id` on every subsequent transaction.
2. **Initialize the Apple Pay launcher.** Call the [create-user-url](./apireference/user/create-user-url) endpoint with the user's `id` and `type: "apple_pay"` when the user loads the payment page, then initialize the SDK launcher with the returned `url`.
* Check `ApplePaySession.canMakePayments()` and render the Apple Pay button only when it returns `true`. For styling and placement, follow Apple's [design guidelines](https://developer.apple.com/design/human-interface-guidelines/apple-pay#Using-Apple-Pay-buttons) and [JavaScript guide](https://developer.apple.com/documentation/applepayontheweb/displaying-apple-pay-buttons-using-javascript).
* To support non-Apple devices or browsers other than Safari, install the [Apple Pay JS SDK](https://developer.apple.com/documentation/applepayontheweb/loading-the-latest-version-of-apple-pay-js) on your cashier. Initiating the payment then displays a QR code the user scans with an Apple device to authorize.
3. **Display the payment sheet.** When the user clicks the Apple Pay button, call `launcher.display()` with the payment `amount`, `currency`, `direction`, and an `onAuthorize` callback. The SDK handles merchant validation and presents the payment sheet.
* Optionally pass an `onComplete` callback that runs when the payment sheet is dismissed.
4. **Authorize the payment.** The `onAuthorize` callback receives a `token` once the user approves with Face ID or Touch ID. Pass the `token`, along with the same `amount`, `currency`, and `direction`, to the [authorize-payment](./apireference/authorization/authorize-payment) endpoint from your backend.
* Return the resulting status (`approved` or `declined`) from `onAuthorize` to complete the Apple Pay session. The `amount` and `currency` sent to `/authorize` must match the values passed to `display()`.
```mermaid theme={null}
sequenceDiagram
participant User
participant Operator
participant SDK as Push SDK
participant Apple as Apple Pay
participant API as Push API
Note over User,API: Step 1: Register the user
Operator->>API: POST /user {name, email, address, phone}
API-->>Operator: {id}
Note over User,API: Step 2: Initialize
User->>Operator: Load payment page
Operator->>API: POST /user/{id}/url {type: "apple_pay"}
API-->>Operator: {url}
Operator->>SDK: new PushCash.ApplePay({url})
Operator->>Operator: Check ApplePaySession.canMakePayments()
Operator->>Operator: Render Apple Pay button
Note over User,API: Step 3: Display Payment Sheet
User->>Operator: Click Apple Pay button
Operator->>SDK: launcher.display({amount, currency, direction, onAuthorize})
SDK->>Apple: Create ApplePaySession & begin()
Note over SDK,Apple: Push validates merchant via mTLS
SDK->>Apple: completeMerchantValidation(session)
Apple->>User: Display payment sheet
Note over User,API: Step 4: Authorize Payment
User->>Apple: Authorize (Face ID / Touch ID)
Apple->>SDK: Receive token
SDK->>Operator: onAuthorize(token)
Operator->>API: POST /authorize {token, amount, currency, direction}
API-->>Operator: {status: "approved" | "declined"}
Operator-->>SDK: Return "approved" | "declined"
SDK->>Apple: completePayment(status)
```
```bash Register User theme={null}
curl --request POST \
--url https://sandbox.pushcash.com/user \
--header 'Authorization: Bearer ' \
--header 'Content-Type: application/json' \
--data '
{
"name": {
"first": "Alfred",
"last": "Hitchcock"
},
"email": "alfred@imdb.com",
"address": {
"address_line_1": "1609 10th Ave",
"locality": "Bodega Bay",
"administrative_area": "CA",
"postal_code": "94923",
"country": "US"
},
"phone_number": "(555) 681-3485",
"tag": "4c8e6b4f"
}
'
```
```bash Create User URL theme={null}
curl --request POST \
--url https://sandbox.pushcash.com/user/{id}/url \
--header 'Authorization: Bearer ' \
--header 'Content-Type: application/json' \
--data '
{
"type": "apple_pay"
}
'
```
```bash Authorize Payment theme={null}
curl --request POST \
--url https://sandbox.pushcash.com/authorize \
--header 'Authorization: Bearer ' \
--header 'Content-Type: application/json' \
--data '
{
"amount": 1000,
"currency": "USD",
"direction": "cash_in",
"token": "token_mbDRHFi3dxIZEtykHsgUGC"
}
'
```
```json Register User - 200 OK theme={null}
{
"id": "user_lVpbPL0K1XIiHx0DxipRbD"
}
```
```json Create User URL - 200 OK theme={null}
{
"url": "https://cdn.pushcash.com/applepay/?param=1¶m=2¶m=3"
}
```
```json Authorize Payment - Approved theme={null}
{
"id": "intent_sandbox_mbDRHFi3dxIZEtykHsgUGC",
"status": "approved"
}
```
```json Authorize Payment - Declined theme={null}
{
"id": "intent_sandbox_mbDRHFi3dxIZEtykHsgUGC",
"status": "declined"
}
```
## Launcher and payment sheet
The Push SDK exposes an `ApplePay` launcher. Instantiate it from the `url` returned by [create-user-url](./apireference/user/create-user-url) **when the page loads** — not inside the button's click handler. Apple only allows the payment sheet to be presented from within a user-gesture handler, so `display()` must run synchronously on the click; the launcher it depends on has to already exist.
Instantiate the launcher on page load and call `display()` directly inside the click handler. If `display()` is reached outside a user-gesture handler — for example after an `await`, or after creating the launcher on click — Apple blocks it and the payment sheet never appears.
```js theme={null}
// On page load: instantiate the launcher from the create-user-url response.
let applePay;
try {
applePay = new window.PushCash.ApplePay({ url });
submitButton.disabled = false;
} catch (error) {
submitButton.disabled = true;
callbackResponse.textContent = `Apple Pay init error: ${error.message}`;
}
// On button click (a user gesture): present the payment sheet.
submitButton.addEventListener('click', () => {
if (!applePay) return;
applePay.display({
amount: 1000, // amount of payment in cents
direction: 'cash_in',
currency: 'USD',
onAuthorize: async (tokenId) => {
// send tokenId to your backend, which calls POST /authorize
const result = await yourBackend.authorize(tokenId);
return result.status; // 'approved' or 'declined'
},
onComplete: async () => {
// reset your UI after the payment sheet is dismissed
submitButton.disabled = true;
},
});
});
```
## Domain registration
Apple Pay on the web requires your cashier to be served over HTTPS on a domain that **Apple has verified**. Verification is a one-time, manual step per domain (you verify your sandbox and production domains separately), completed together with Push Cash:
1. **Supply your domain.** Give your Push Cash representative the exact domain your cashier is served from (for example, `cashier.your-domain.com`). For sandbox, email [hello@pushcash.com](mailto:hello@pushcash.com).
2. **Receive the domain association file.** Push generates and sends you the `apple-developer-merchantid-domain-association.txt` file for that domain over Slack or email.
3. **Host the file.** Place it at:
```text theme={null}
https://your-domain.com/.well-known/apple-developer-merchantid-domain-association.txt
```
4. **Push verifies the domain.** Once the file is reachable over HTTPS, Push verifies the domain in the Apple developer console. This must be done by Push — it is not self-serve.
Production domain verification is completed live on your go-live call. See the [Go-Live Checklist](./go-live-checklist) for the full production cutover.
## Withdrawals
A returning user can withdraw funds to a debit card they previously deposited with via Apple Pay — no re-authentication through the payment sheet is required. Users must have completed at least one deposit through the flow above before a withdrawal credential is available.
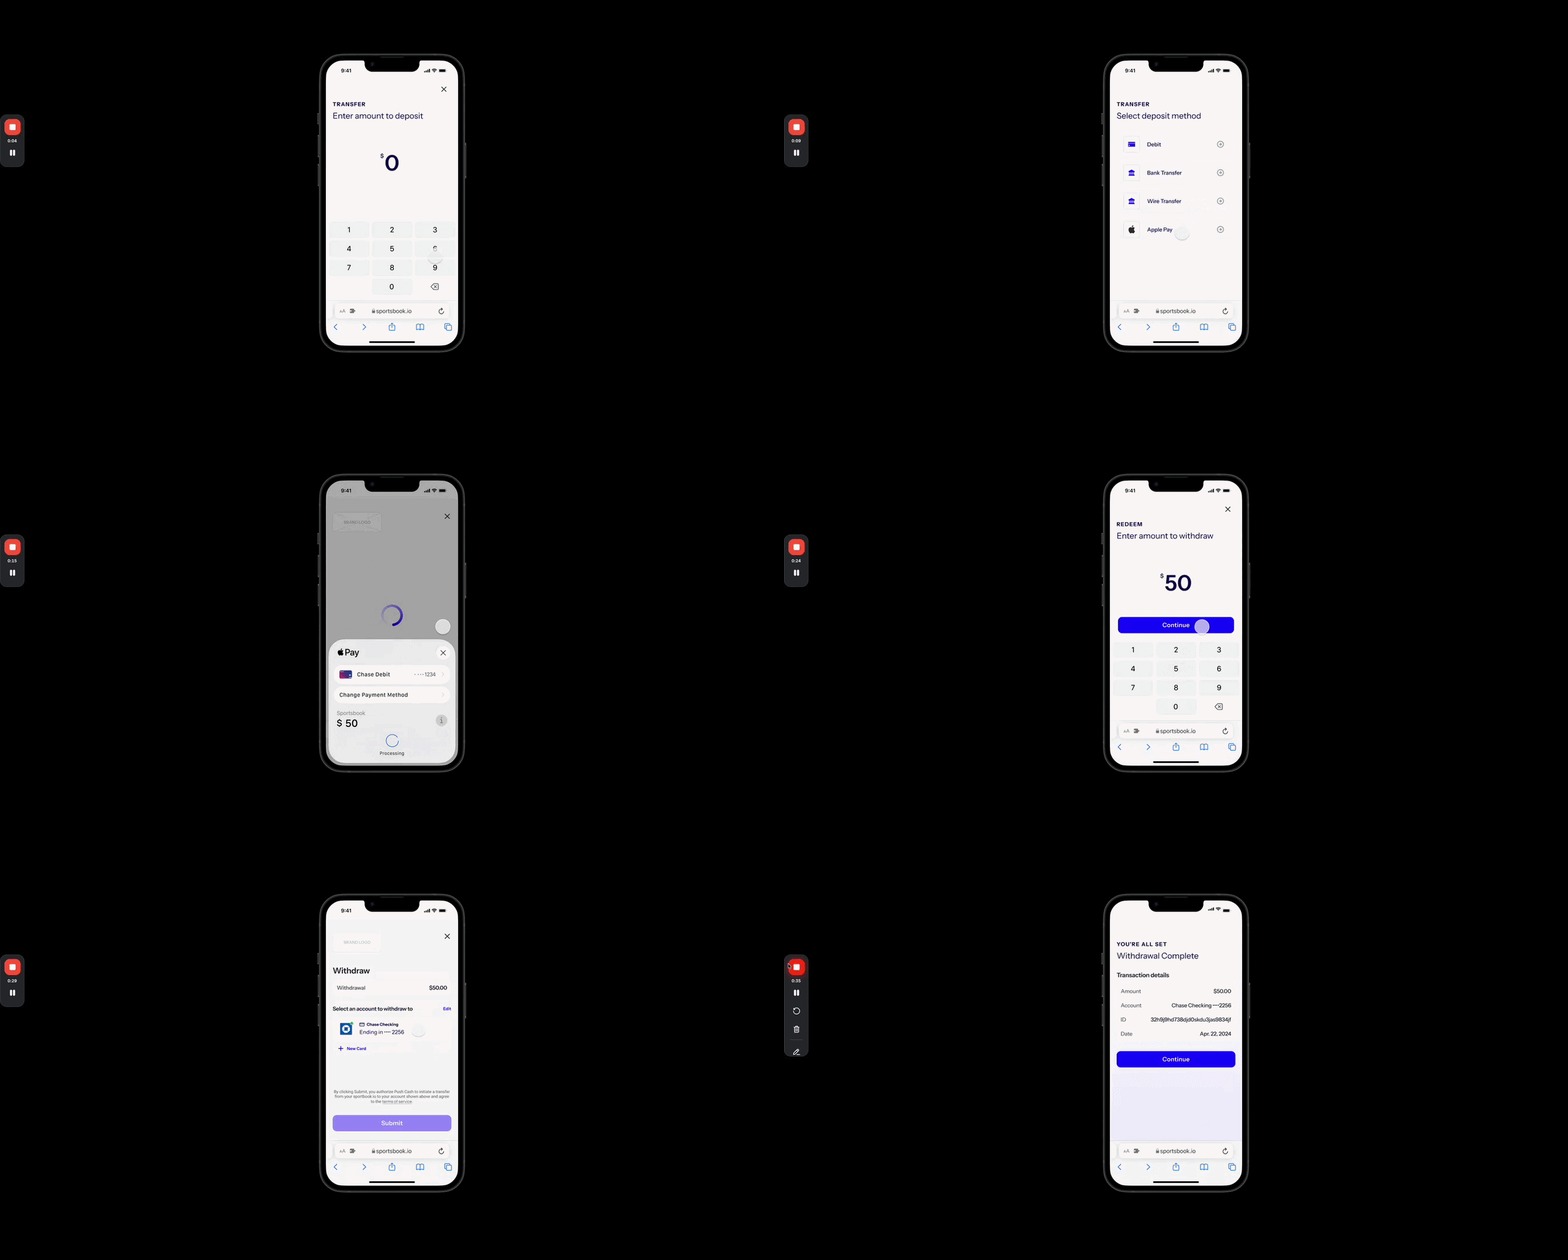 1. **Display stored credentials.** Call the [list-user-credentials](/apireference/user/list-user-credentials) endpoint with the user's ID, passing `apple_pay_debit` as a `type` query parameter (`?type=apple_pay_debit`). Render the returned credentials so the user can pick which card to withdraw to.
* Only deposits made with a **debit** card create an `apple_pay_debit` credential. Deposits made with a credit card do not create a withdrawal-eligible credential.
2. **Submit the withdrawal.** Call the [authorize-payment](/apireference/authorization/authorize-payment) endpoint with the selected `credential_id`, `direction: cash_out`, and the `amount`.
* A `200` response means the withdrawal was approved — display the result to the user.
* Handle a `401` response. In a small number of cases the debit card does not support **OCT** (Original Credit Transactions), which are required to push funds to a card. This is determined by the card issuer and cannot be resolved for that card — prompt the user to select or add a different debit card.
```bash List User Credentials theme={null}
curl --request GET \
--url 'https://sandbox.pushcash.com/user/{id}/credentials?type=apple_pay_debit' \
--header 'Authorization: Bearer '
```
```bash Authorize Withdrawal theme={null}
curl --request POST \
--url https://sandbox.pushcash.com/authorize \
--header 'Authorization: Bearer ' \
--header 'Content-Type: application/json' \
--data '
{
"user_id": "user_lVpbPL0K1XIiHx0DxipRbD",
"credential_id": "cred_sandbox_123",
"amount": 2500,
"currency": "USD",
"direction": "cash_out"
}
'
```
```json List User Credentials - 200 OK theme={null}
{
"data": [
{
"id": "cred_7YlA9IiSl8UZvNwNSbFajV",
"created_at": "2023-05-24T20:15:18.158Z",
"card_last4": "4444",
"authenticated": true,
"type": "apple_pay_debit",
"account_last4": null,
"bank_name": null
}
]
}
```
## Sandbox testing
Test the full flow against the sandbox host (`sandbox.pushcash.com`) before going live. To exercise the payment sheet on the **web**, deploy your sandbox cashier to a verified HTTPS domain (see [Domain registration](/apple-pay-web#domain-registration)) — Apple Pay cannot run on `localhost`. In an **app**, test on a physical device signed in to an [Apple sandbox tester account](https://developer.apple.com/apple-pay/sandbox-testing/) — the iOS simulator does not produce real encrypted payment data.
In sandbox, simulate a declined authorization by submitting for `2200` cents (\$22.00). Any other amount is approved. This applies to both deposit authorizations and withdrawal OCT declines.
### Simulating a stored credential
To test withdrawals without performing a real Apple Pay deposit, create a stored `apple_pay_debit` credential with synthetic card data using the [simulate-credential](/apireference/simulation/simulate-a-stored-credential) endpoint:
```bash theme={null}
curl --request POST \
--url https://sandbox.pushcash.com/sandbox/credential \
--header 'Authorization: Bearer ' \
--header 'Content-Type: application/json' \
--data '
{
"user_id": "user_lVpbPL0K1XIiHx0DxipRbD",
"type": "apple_pay_debit",
"card_last4": "9010"
}
'
```
The returned credential behaves like any stored credential: it appears in [list-user-credentials](/apireference/user/list-user-credentials) and can be used to authorize `cash_out` payments. The endpoint is available in sandbox alone.
### Integration checklist
Work through the following before requesting production access:
* Simulate an approved deposit by submitting a payment for \$10.00
* Simulate a declined deposit by submitting a payment for \$22.00
* Create an `apple_pay_debit` credential using the [simulate-credential](/apireference/simulation/simulate-a-stored-credential) endpoint, verify it is returned by [list-user-credentials](/apireference/user/list-user-credentials) with `?type=apple_pay_debit` and displayed with `card_last4`, and test a withdrawal to it
* Test an OCT decline by submitting a `cash_out` for `2200` cents (\$22.00) against an `apple_pay_debit` credential
## Next steps
* Set up webhooks to receive asynchronous updates about payment status — see the [enabling webhooks](/enabling-webhooks) guide.
* Move your integration from sandbox to production with the [Go-Live Checklist](/go-live-checklist).
1. **Display stored credentials.** Call the [list-user-credentials](/apireference/user/list-user-credentials) endpoint with the user's ID, passing `apple_pay_debit` as a `type` query parameter (`?type=apple_pay_debit`). Render the returned credentials so the user can pick which card to withdraw to.
* Only deposits made with a **debit** card create an `apple_pay_debit` credential. Deposits made with a credit card do not create a withdrawal-eligible credential.
2. **Submit the withdrawal.** Call the [authorize-payment](/apireference/authorization/authorize-payment) endpoint with the selected `credential_id`, `direction: cash_out`, and the `amount`.
* A `200` response means the withdrawal was approved — display the result to the user.
* Handle a `401` response. In a small number of cases the debit card does not support **OCT** (Original Credit Transactions), which are required to push funds to a card. This is determined by the card issuer and cannot be resolved for that card — prompt the user to select or add a different debit card.
```bash List User Credentials theme={null}
curl --request GET \
--url 'https://sandbox.pushcash.com/user/{id}/credentials?type=apple_pay_debit' \
--header 'Authorization: Bearer '
```
```bash Authorize Withdrawal theme={null}
curl --request POST \
--url https://sandbox.pushcash.com/authorize \
--header 'Authorization: Bearer ' \
--header 'Content-Type: application/json' \
--data '
{
"user_id": "user_lVpbPL0K1XIiHx0DxipRbD",
"credential_id": "cred_sandbox_123",
"amount": 2500,
"currency": "USD",
"direction": "cash_out"
}
'
```
```json List User Credentials - 200 OK theme={null}
{
"data": [
{
"id": "cred_7YlA9IiSl8UZvNwNSbFajV",
"created_at": "2023-05-24T20:15:18.158Z",
"card_last4": "4444",
"authenticated": true,
"type": "apple_pay_debit",
"account_last4": null,
"bank_name": null
}
]
}
```
## Sandbox testing
Test the full flow against the sandbox host (`sandbox.pushcash.com`) before going live. To exercise the payment sheet on the **web**, deploy your sandbox cashier to a verified HTTPS domain (see [Domain registration](/apple-pay-web#domain-registration)) — Apple Pay cannot run on `localhost`. In an **app**, test on a physical device signed in to an [Apple sandbox tester account](https://developer.apple.com/apple-pay/sandbox-testing/) — the iOS simulator does not produce real encrypted payment data.
In sandbox, simulate a declined authorization by submitting for `2200` cents (\$22.00). Any other amount is approved. This applies to both deposit authorizations and withdrawal OCT declines.
### Simulating a stored credential
To test withdrawals without performing a real Apple Pay deposit, create a stored `apple_pay_debit` credential with synthetic card data using the [simulate-credential](/apireference/simulation/simulate-a-stored-credential) endpoint:
```bash theme={null}
curl --request POST \
--url https://sandbox.pushcash.com/sandbox/credential \
--header 'Authorization: Bearer ' \
--header 'Content-Type: application/json' \
--data '
{
"user_id": "user_lVpbPL0K1XIiHx0DxipRbD",
"type": "apple_pay_debit",
"card_last4": "9010"
}
'
```
The returned credential behaves like any stored credential: it appears in [list-user-credentials](/apireference/user/list-user-credentials) and can be used to authorize `cash_out` payments. The endpoint is available in sandbox alone.
### Integration checklist
Work through the following before requesting production access:
* Simulate an approved deposit by submitting a payment for \$10.00
* Simulate a declined deposit by submitting a payment for \$22.00
* Create an `apple_pay_debit` credential using the [simulate-credential](/apireference/simulation/simulate-a-stored-credential) endpoint, verify it is returned by [list-user-credentials](/apireference/user/list-user-credentials) with `?type=apple_pay_debit` and displayed with `card_last4`, and test a withdrawal to it
* Test an OCT decline by submitting a `cash_out` for `2200` cents (\$22.00) against an `apple_pay_debit` credential
## Next steps
* Set up webhooks to receive asynchronous updates about payment status — see the [enabling webhooks](/enabling-webhooks) guide.
* Move your integration from sandbox to production with the [Go-Live Checklist](/go-live-checklist).