> ## Documentation Index
> Fetch the complete documentation index at: https://docs.pushcash.com/llms.txt
> Use this file to discover all available pages before exploring further.
# Apple Pay Mobile
## Overview
On iOS, your app presents the payment sheet directly with [PassKit](https://developer.apple.com/documentation/passkit) under your own Apple merchant ID. After the user authorizes, your app receives an encrypted `PKPaymentToken`; your backend exchanges it for a Push token with the tokens API and authorizes the payment.
The Apple Pay payload is encrypted by Apple to a payment processing certificate held by Push. Your app and your servers forward it as ciphertext and never handle raw card numbers.
## Configuration
Apple requires the merchant ID used in an app to belong to the Apple Developer team that signs the app. This is a one-time setup, completed together with Push Cash:
1. **Create a merchant ID in your Apple Developer account.** In [Certificates, Identifiers & Profiles](https://developer.apple.com/help/account/capabilities/configure-apple-pay), create a merchant identifier (for example, `merchant.com.your-company.cashier`).
2. **Add the Apple Pay capability to your app.** In Xcode, add the **Apple Pay** capability to your app target and select the merchant ID. This places it in the app's `com.apple.developer.in-app-payments` entitlement.
3. **Issue the payment processing certificate with Push.** Push generates the key pair and sends you a certificate signing request (CSR). Upload the CSR under your merchant ID in the Apple developer console (**Apple Pay Payment Processing Certificate**) and share the issued certificate with your Push Cash representative.
Apple Pay payment processing certificates are valid for 25 months. Push will work with you to re-provision a fresh payment processing cert before expiration.
## Integration overview
The steps below show an overview of how to accept an Apple Pay deposit from your iOS app.
1. **Register the user.** Call the [create-user](./apireference/user/create-user) endpoint with the user's name, email, address, and phone number.
* Store the returned Push `id` alongside your internal user record.
* Register each user **only once** and reuse the user's `id` on every subsequent transaction.
2. **Present the payment sheet.** Build a `PKPaymentRequest` with your merchant ID, `merchantCapabilities: [.threeDSecure]`, the card networks enabled for your account, and the payment amount, then present a `PKPaymentAuthorizationController`. See [Payment sheet](#payment-sheet).
* Check `PKPaymentAuthorizationController.canMakePayments()` and render the Apple Pay button only when it returns `true`. For styling and placement, follow Apple's [design guidelines](https://developer.apple.com/design/human-interface-guidelines/apple-pay#Using-Apple-Pay-buttons).
3. **Tokenize the payment.** When the user authorizes with Face ID or Touch ID, your delegate receives a `PKPayment` containing the encrypted `PKPaymentToken`. Send it to your backend, and exchange it for a Push token by calling the [tokenize](./apireference/tokenization/tokenize-card) endpoint on the tokens domain with the user's `id`, `type: "apple_pay"`, and the serialized token as `apple_pay_token`.
* The token's `transactionIdentifier` acts as an idempotency key — submitting the same `PKPaymentToken` twice returns the same Push token.
4. **Authorize the payment.** Pass the returned `token`, along with the `amount`, `currency`, and `direction: "cash_in"`, to the [authorize-payment](./apireference/authorization/authorize-payment) endpoint from your backend, then return the result to your app and complete the payment sheet by passing a `PKPaymentAuthorizationResult` to the delegate's completion handler.
```bash Tokenize Apple Pay theme={null}
curl --request POST \
--url https://sandbox-tokens.pushcash.com/tokenize \
--header 'Authorization: Bearer ' \
--header 'Content-Type: application/json' \
--data '
{
"user_id": "user_lVpbPL0K1XIiHx0DxipRbD",
"type": "apple_pay",
"apple_pay_token": {
"paymentData": {
"data": "",
"header": {
"ephemeralPublicKey": "",
"publicKeyHash": "",
"transactionId": "c8b4..."
},
"signature": "",
"version": "EC_v1"
},
"paymentMethod": {
"displayName": "Visa 4444",
"network": "Visa",
"type": "debit"
},
"transactionIdentifier": "c8b4f9b2e6d14a5f9c3e7d0a1b2c3d4e"
}
}
'
```
```bash Authorize Payment theme={null}
curl --request POST \
--url https://sandbox.pushcash.com/authorize \
--header 'Authorization: Bearer ' \
--header 'Content-Type: application/json' \
--data '
{
"amount": 1000,
"currency": "USD",
"direction": "cash_in",
"token": "token_mbDRHFi3dxIZEtykHsgUGC"
}
'
```
```json Tokenize Apple Pay - 200 OK theme={null}
{
"token": "token_mbDRHFi3dxIZEtykHsgUGC"
}
```
```json Authorize Payment - Approved theme={null}
{
"id": "intent_sandbox_mbDRHFi3dxIZEtykHsgUGC",
"status": "approved"
}
```
```json Authorize Payment - Declined theme={null}
{
"id": "intent_sandbox_mbDRHFi3dxIZEtykHsgUGC",
"status": "declined"
}
```
## Payment sheet
Present the payment sheet from your app with a `PKPaymentRequest`. The merchant ID must match your app's entitlement (see [Configuration](#configuration)).
```swift theme={null}
import PassKit
// Render the Apple Pay button only when the device can pay.
guard PKPaymentAuthorizationController.canMakePayments() else { return }
// On tap: build the request and present the sheet.
let request = PKPaymentRequest()
request.merchantIdentifier = "merchant.com.your-company.cashier"
request.merchantCapabilities = [.threeDSecure]
request.supportedNetworks = [.visa, .masterCard, .discover]
request.countryCode = "US"
request.currencyCode = "USD"
request.paymentSummaryItems = [
PKPaymentSummaryItem(label: "Deposit", amount: NSDecimalNumber(string: "10.00")),
]
let controller = PKPaymentAuthorizationController(paymentRequest: request)
controller.delegate = self
controller.present()
```
## Withdrawals
A returning user can withdraw funds to a debit card they previously deposited with via Apple Pay — no re-authentication through the payment sheet is required. Users must have completed at least one deposit through the flow above before a withdrawal credential is available.
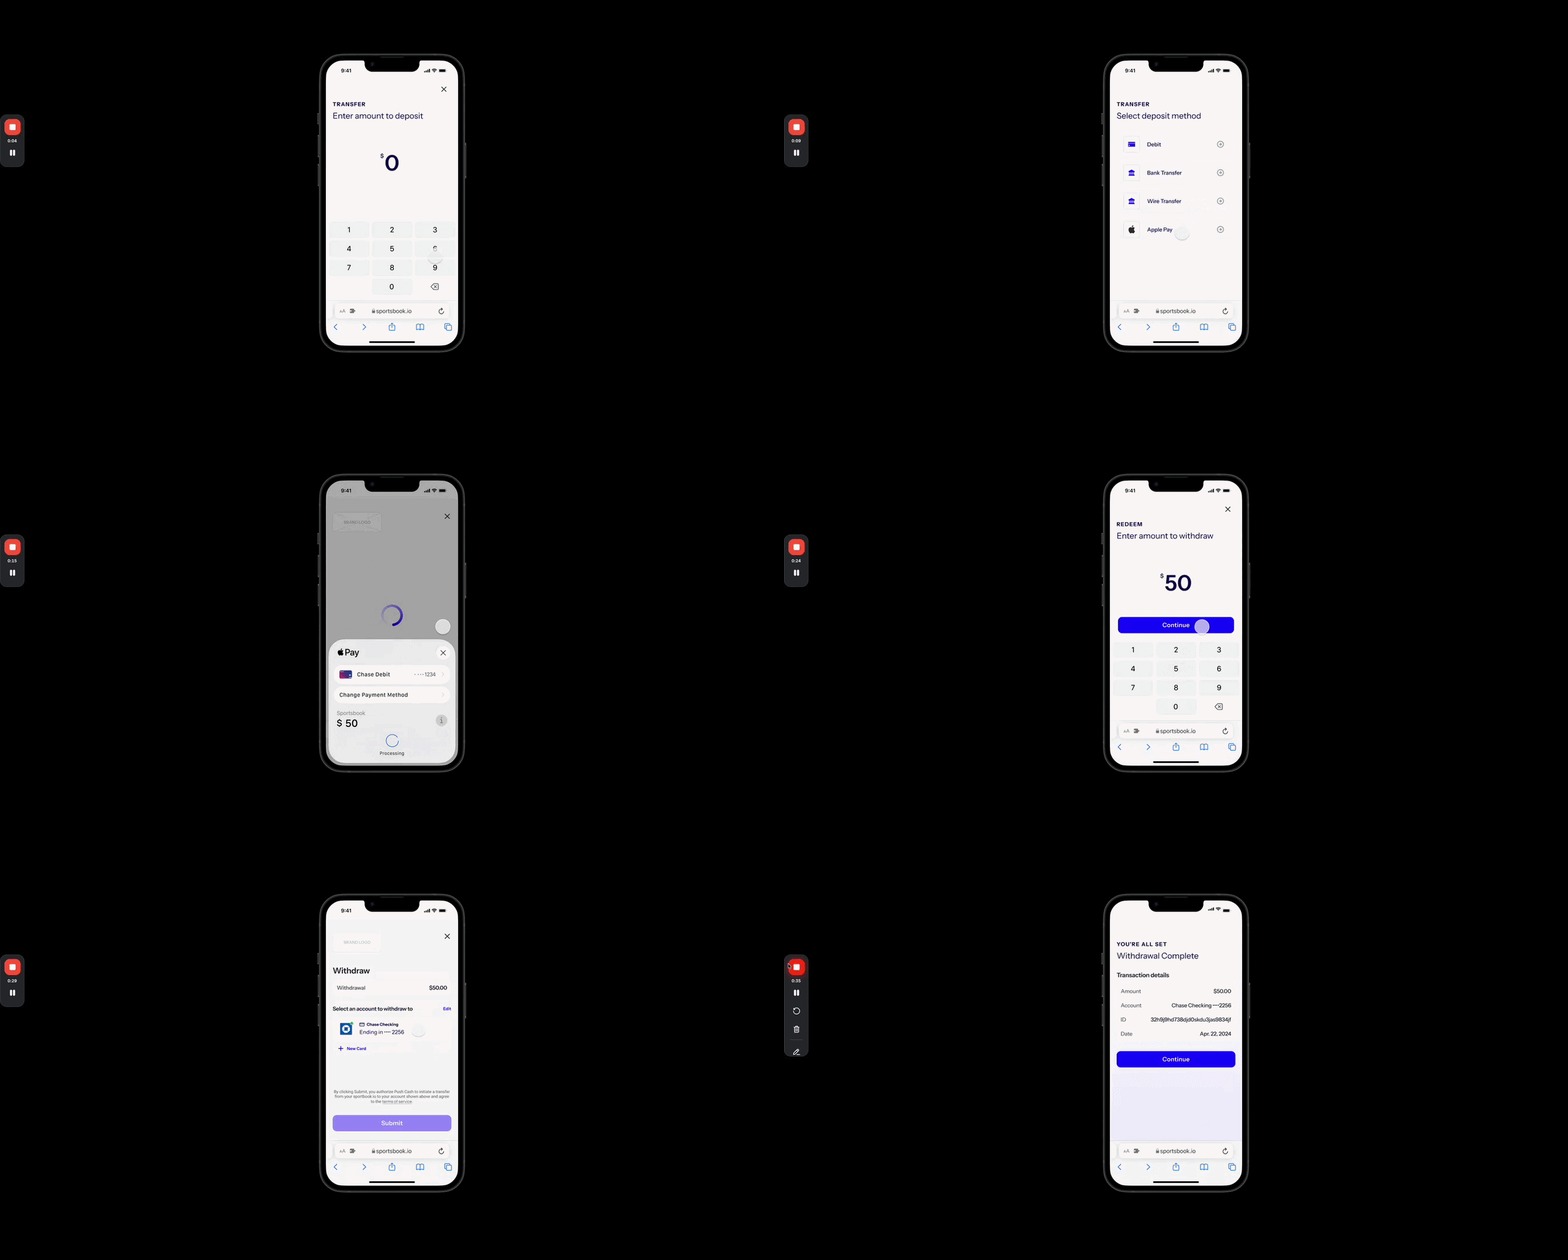 1. **Display stored credentials.** Call the [list-user-credentials](/apireference/user/list-user-credentials) endpoint with the user's ID, passing `apple_pay_debit` as a `type` query parameter (`?type=apple_pay_debit`). Render the returned credentials so the user can pick which card to withdraw to.
* Only deposits made with a **debit** card create an `apple_pay_debit` credential. Deposits made with a credit card do not create a withdrawal-eligible credential.
2. **Submit the withdrawal.** Call the [authorize-payment](/apireference/authorization/authorize-payment) endpoint with the selected `credential_id`, `direction: cash_out`, and the `amount`.
* A `200` response means the withdrawal was approved — display the result to the user.
* Handle a `401` response. In a small number of cases the debit card does not support **OCT** (Original Credit Transactions), which are required to push funds to a card. This is determined by the card issuer and cannot be resolved for that card — prompt the user to select or add a different debit card.
```bash List User Credentials theme={null}
curl --request GET \
--url 'https://sandbox.pushcash.com/user/{id}/credentials?type=apple_pay_debit' \
--header 'Authorization: Bearer '
```
```bash Authorize Withdrawal theme={null}
curl --request POST \
--url https://sandbox.pushcash.com/authorize \
--header 'Authorization: Bearer ' \
--header 'Content-Type: application/json' \
--data '
{
"user_id": "user_lVpbPL0K1XIiHx0DxipRbD",
"credential_id": "cred_sandbox_123",
"amount": 2500,
"currency": "USD",
"direction": "cash_out"
}
'
```
```json List User Credentials - 200 OK theme={null}
{
"data": [
{
"id": "cred_7YlA9IiSl8UZvNwNSbFajV",
"created_at": "2023-05-24T20:15:18.158Z",
"card_last4": "4444",
"authenticated": true,
"type": "apple_pay_debit",
"account_last4": null,
"bank_name": null
}
]
}
```
## Sandbox testing
Test the full flow against the sandbox host (`sandbox.pushcash.com`) before going live. To exercise the payment sheet on the **web**, deploy your sandbox cashier to a verified HTTPS domain (see [Domain registration](/apple-pay-web#domain-registration)) — Apple Pay cannot run on `localhost`. In an **app**, test on a physical device signed in to an [Apple sandbox tester account](https://developer.apple.com/apple-pay/sandbox-testing/) — the iOS simulator does not produce real encrypted payment data.
In sandbox, simulate a declined authorization by submitting for `2200` cents (\$22.00). Any other amount is approved. This applies to both deposit authorizations and withdrawal OCT declines.
### Simulating a stored credential
To test withdrawals without performing a real Apple Pay deposit, create a stored `apple_pay_debit` credential with synthetic card data using the [simulate-credential](/apireference/simulation/simulate-a-stored-credential) endpoint:
```bash theme={null}
curl --request POST \
--url https://sandbox.pushcash.com/sandbox/credential \
--header 'Authorization: Bearer ' \
--header 'Content-Type: application/json' \
--data '
{
"user_id": "user_lVpbPL0K1XIiHx0DxipRbD",
"type": "apple_pay_debit",
"card_last4": "9010"
}
'
```
The returned credential behaves like any stored credential: it appears in [list-user-credentials](/apireference/user/list-user-credentials) and can be used to authorize `cash_out` payments. The endpoint is available in sandbox alone.
### Integration checklist
Work through the following before requesting production access:
* Simulate an approved deposit by submitting a payment for \$10.00
* Simulate a declined deposit by submitting a payment for \$22.00
* Create an `apple_pay_debit` credential using the [simulate-credential](/apireference/simulation/simulate-a-stored-credential) endpoint, verify it is returned by [list-user-credentials](/apireference/user/list-user-credentials) with `?type=apple_pay_debit` and displayed with `card_last4`, and test a withdrawal to it
* Test an OCT decline by submitting a `cash_out` for `2200` cents (\$22.00) against an `apple_pay_debit` credential
## Next steps
* Set up webhooks to receive asynchronous updates about payment status — see the [enabling webhooks](/enabling-webhooks) guide.
* Move your integration from sandbox to production with the [Go-Live Checklist](/go-live-checklist).
1. **Display stored credentials.** Call the [list-user-credentials](/apireference/user/list-user-credentials) endpoint with the user's ID, passing `apple_pay_debit` as a `type` query parameter (`?type=apple_pay_debit`). Render the returned credentials so the user can pick which card to withdraw to.
* Only deposits made with a **debit** card create an `apple_pay_debit` credential. Deposits made with a credit card do not create a withdrawal-eligible credential.
2. **Submit the withdrawal.** Call the [authorize-payment](/apireference/authorization/authorize-payment) endpoint with the selected `credential_id`, `direction: cash_out`, and the `amount`.
* A `200` response means the withdrawal was approved — display the result to the user.
* Handle a `401` response. In a small number of cases the debit card does not support **OCT** (Original Credit Transactions), which are required to push funds to a card. This is determined by the card issuer and cannot be resolved for that card — prompt the user to select or add a different debit card.
```bash List User Credentials theme={null}
curl --request GET \
--url 'https://sandbox.pushcash.com/user/{id}/credentials?type=apple_pay_debit' \
--header 'Authorization: Bearer '
```
```bash Authorize Withdrawal theme={null}
curl --request POST \
--url https://sandbox.pushcash.com/authorize \
--header 'Authorization: Bearer ' \
--header 'Content-Type: application/json' \
--data '
{
"user_id": "user_lVpbPL0K1XIiHx0DxipRbD",
"credential_id": "cred_sandbox_123",
"amount": 2500,
"currency": "USD",
"direction": "cash_out"
}
'
```
```json List User Credentials - 200 OK theme={null}
{
"data": [
{
"id": "cred_7YlA9IiSl8UZvNwNSbFajV",
"created_at": "2023-05-24T20:15:18.158Z",
"card_last4": "4444",
"authenticated": true,
"type": "apple_pay_debit",
"account_last4": null,
"bank_name": null
}
]
}
```
## Sandbox testing
Test the full flow against the sandbox host (`sandbox.pushcash.com`) before going live. To exercise the payment sheet on the **web**, deploy your sandbox cashier to a verified HTTPS domain (see [Domain registration](/apple-pay-web#domain-registration)) — Apple Pay cannot run on `localhost`. In an **app**, test on a physical device signed in to an [Apple sandbox tester account](https://developer.apple.com/apple-pay/sandbox-testing/) — the iOS simulator does not produce real encrypted payment data.
In sandbox, simulate a declined authorization by submitting for `2200` cents (\$22.00). Any other amount is approved. This applies to both deposit authorizations and withdrawal OCT declines.
### Simulating a stored credential
To test withdrawals without performing a real Apple Pay deposit, create a stored `apple_pay_debit` credential with synthetic card data using the [simulate-credential](/apireference/simulation/simulate-a-stored-credential) endpoint:
```bash theme={null}
curl --request POST \
--url https://sandbox.pushcash.com/sandbox/credential \
--header 'Authorization: Bearer ' \
--header 'Content-Type: application/json' \
--data '
{
"user_id": "user_lVpbPL0K1XIiHx0DxipRbD",
"type": "apple_pay_debit",
"card_last4": "9010"
}
'
```
The returned credential behaves like any stored credential: it appears in [list-user-credentials](/apireference/user/list-user-credentials) and can be used to authorize `cash_out` payments. The endpoint is available in sandbox alone.
### Integration checklist
Work through the following before requesting production access:
* Simulate an approved deposit by submitting a payment for \$10.00
* Simulate a declined deposit by submitting a payment for \$22.00
* Create an `apple_pay_debit` credential using the [simulate-credential](/apireference/simulation/simulate-a-stored-credential) endpoint, verify it is returned by [list-user-credentials](/apireference/user/list-user-credentials) with `?type=apple_pay_debit` and displayed with `card_last4`, and test a withdrawal to it
* Test an OCT decline by submitting a `cash_out` for `2200` cents (\$22.00) against an `apple_pay_debit` credential
## Next steps
* Set up webhooks to receive asynchronous updates about payment status — see the [enabling webhooks](/enabling-webhooks) guide.
* Move your integration from sandbox to production with the [Go-Live Checklist](/go-live-checklist).